Detailed
Design
Requested
by:
Dr.
Scott Hunter
Assistant
Professor
Computer
Science Department
Ms.
Jami Cotler
Instructor
Computer
Science Department
Excel
Grading System
NSG
Software
Prepared
by:
Justin Spegele –
Team Leader & Webmaster
Kristen Dobreski –
Testing Manager
Dan Lomanto – Development Manager
Matt Warner – Lead
Programmer & System Admin
February
21, 2006
Excel
Grading System
Detailed
Design
Detailed
Design:
Section
1: External Design Specifications
1.1: User Displays…………………….............................................3-22
1.2: Detailed Data Flow Diagrams..................................................24-32
1.3: Logical
Data Dictionary*..…………………………………...33-49
1.4: Logical
Data Stores…………………………………………..50-51
1.5: Entity-Relationship
Diagram..…………………………………...51
Section
2: Architectural Design Specification
2.1: Structure Diagram..........................................................................52
2.2: Use Cases.................................................................................53-55
2.3: Functional Requirements.........................................................55-56
2.4: Development Environment……....................................................56
2.5: Production
Environment…………………………………………57
Section
3: Detailed Design Specification
3.1: Documentation Prologue for each Routine…………………..58-59
3.2: Pseudocode for
each Routine………………………………...60-61
3.3: Packaging
Specifications………………………………………...61
Section
4: Testing Requirements*………………………………………….62
4.1: Test Plan….…………….........................................................63-70
4.2: Unit Test Sheets.....................................................................71-104
Section
5: Gantt Chart..................................................................................105
Section
6: Glossary................................................................................106-107
*Contains a further breakdown of the contents within the
section.
Section
1: External Design Specifications
Student
Registration Page
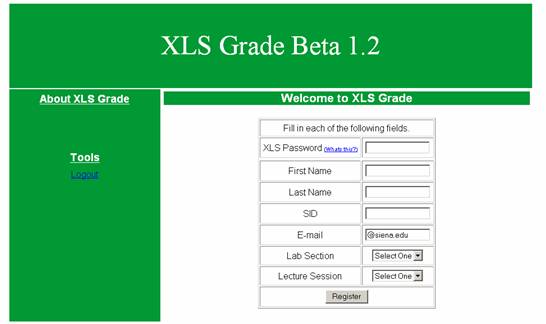
This is the page that students will be
brought to when they click “New Student” on the main login page. Here students will fill in their information,
including name, SID, email and sections they are registered for, in order to
register with the XLS system. Also,
students will be required to enter an XLS password which will be given to them
by one of their instructors. This
password will allow them to register with the system.
Lecture Instructor
Registration Page
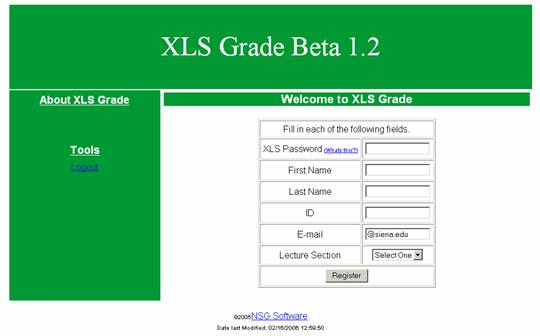
This is the page that lecture instructors
will be brought to when they click “New Lecture Instructor” on the main login
page. Here lecture instructors will fill
in their information, including name, ID, email and sections they are
registered for, in order to register with the XLS system. At this point, there is only capability for
the instructor to register for one section.
The complete system will allow instructors to register for multiple
sections. Also, lecture instructors will
be required to enter an XLS password which will be given to them by the course
coordinator. This password will allow
them to register with the system.
Lab Instructor
Registration Page
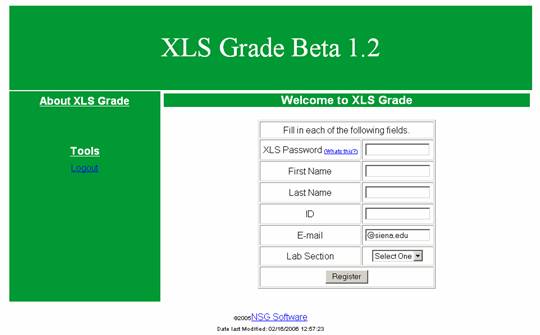
This is the page that lab instructors
will be brought to when they click “New Lab Instructor” on the main login
page. Here lab instructors will fill in
their information, including name, ID, email and sections they are registered
for, in order to register with the XLS system.
At this point, there is only capability for the instructor to register
for one section. The complete system
will allow instructors to register for multiple sections. Also, lab instructors will be required to
enter an XLS password which will be given to them by the course coordinator. This password will allow them to register
with the system.
Course
Coordinator - Main Page
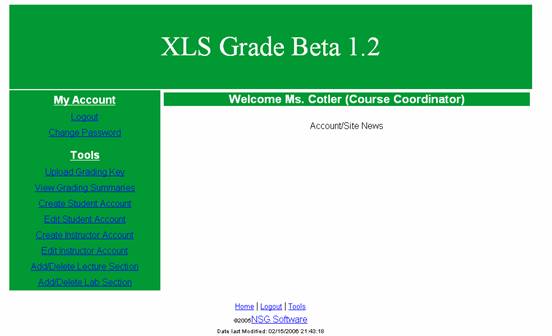
This
is the splash page for the Course Coordinator.
Each of the Course Coordinator’s pages will contain all of the same
links on the left hand side, and the same footer on the bottom. Eventually this is the page that will contain
any system updates, reminders, account status updates or any other news that
needs to be presented to the user.
Course
Coordinator - Change Password
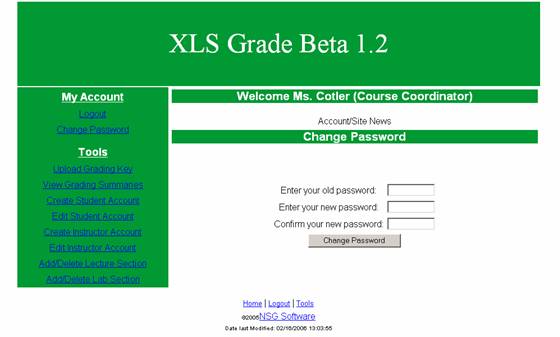
This
is the Course Coordinator’s change password page. Here the user has the ability to change their
login password for the system. The user
will enter their old (current) password, their new password and then their new
password again as a confirmation. Upon
clicking “Change Password” the user will receive an alert message confirming
that their password has been changed.
Eventually this will be an encrypted page (HTTPS), but as of now, it uses
simple HTML password input.
Course
Coordinator - Upload Grading Key
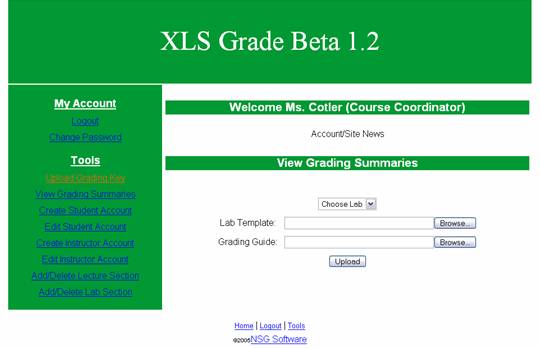
This
is the Course Coordinator’s “Upload Grading Key” page. On this page the course coordinator will
select a lab and browse for two files which together make up the grading key
for that lab. The first is the Excel
file that will be used as the template for the lab. The second file is the guide that will tell
the system what items need to be checked for in each cell (is the cell bold, is
there a formula, etc.) and how many points each item is worth.
Course
Coordinator - View Grading Summaries
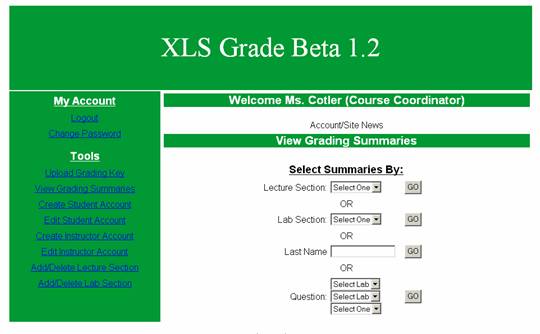
This
is the “View Grading Summaries” page for the Course Coordinator. Here the user has the option of choosing from
various types of lab summaries.
Summaries can be viewed by lab section or lecture section. There are also summaries about single
students. The user just searches by the
student’s last name, bringing them to a page containing all of the information
for that student, with separate links to that students individual lab
summaries. Finally, the Course
Coordinator can search by question. The
user would first select a lab, which populates the second select box with the
questions from that lab, and then the third box is used to specify if the
summary should be based on an individual section or on all students.
Course
Coordinator - Edit Student Account

This
is the Course Coordinator’s “Edit Student Account” page. Here the user can change any information
stored in the database on an individual student. The main uses of this page would be to change
a student’s lab or lecture section if they switch sections and to delete a
student all-together if they drop the class.
Course
Coordinator - Edit Instructor Account
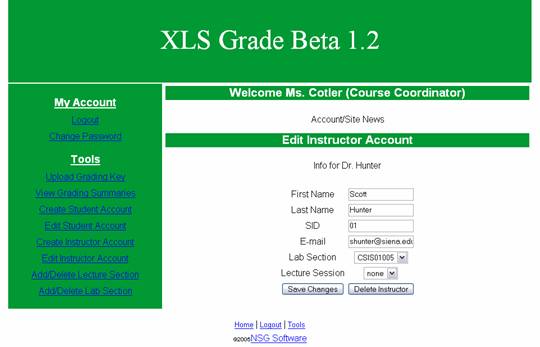
This
is the Course Coordinator’s “Edit Instructor Account” page. Here the user can change any information
stored in the database on an individual instructor, or delete the instructor
entirely. The main uses of this page would
be to add lab and/or lecture sections to an instructors account and to change
an instructors lab and/or lecture sections
Course
Coordinator – Add/Delete Lecture Section
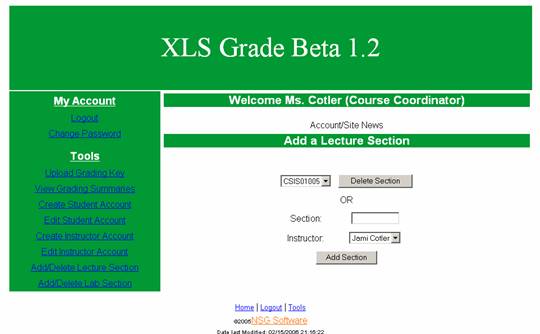
This
is the Course Coordinator’s “Add/Delete Lecture Section” page. This page allows the user to add a lecture
section to the system and to delete existing sections. The main uses of this page will be to add
lecture sections to the system at the beginning of each semester and to delete
lecture sections at the end of the semester or if a section is dropped.
Course
Coordinator – Add/Delete Lab Section
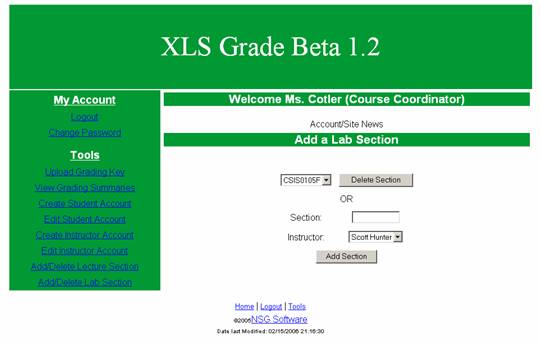
This is the Course Coordinator’s
“Add/Delete Lab Section” page. This page
allows the user to add a lab section to the system and to delete existing
sections. The main uses of this page
will be to add lab sections to the system at the beginning of each semester and
to delete lab sections at the end of the semester or if a section is dropped.
Lab Instructor
– Main Page
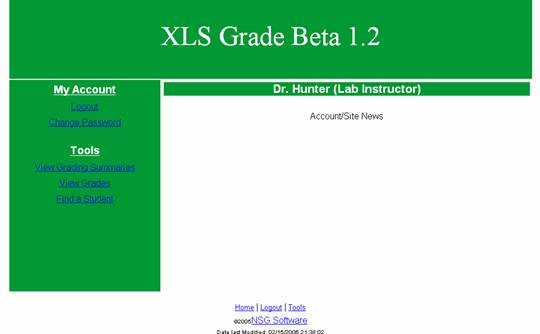
This is the splash page for
Instructors. Each of the Instructor’s
pages will contain all of the same links on the left hand side, and the same
footer on the bottom. Eventually this is
the page that will contain any system updates, reminders, account status
updates or any other news that needs to be presented to the user.
Lab Instructor
– Change Password Page
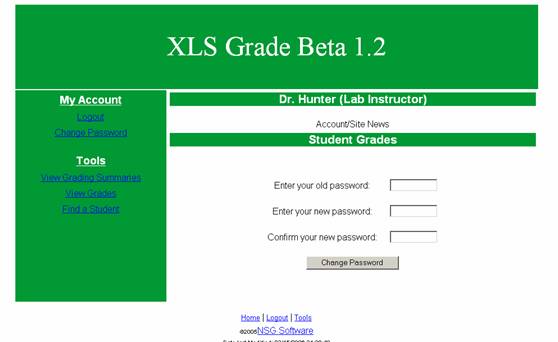
This is the Instructor’s change password
page. Here the user has the ability to
change their login password for the system.
The user will enter their old (current) password, their new password and
then their new password again as a confirmation. Upon clicking “Change Password” the user will
receive an alert message confirming that their password has been changed. Eventually this will be an encrypted page
(HTTPS), but as of now, it uses simple HTML password input.
Lab Instructor
– View Grading Summaries
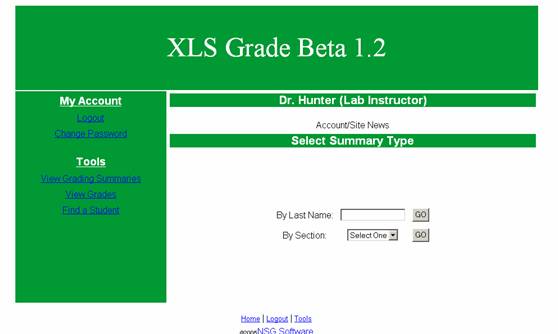
This
is the Instructor’s “View Grading Summaries” page. From this page the Instructor can either
search for a student by last name, which will bring them to the “View Student”
page (shown on the next page of this document), or search for a section, which
will bring them to the “View Grades” page.
The Instructor will be able to search for any student and any section
throughout the course.
Lab Instructor
– View Grades
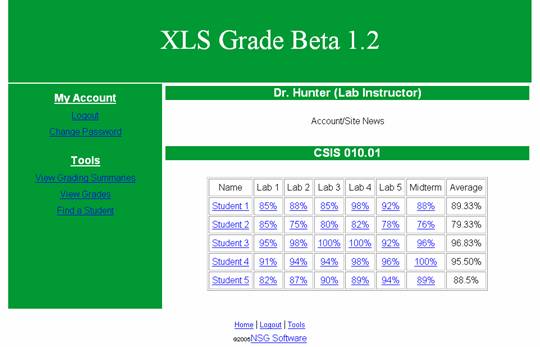
This
is the Instructor’s “View Grades” page.
This page gives the Instructor a chart listing all students, as links to
“View Student” within the section they searched for, their grades for each
Excel assignment, as a link to a summary of that student’s lab, and their grade
average.
Lab Instructor
– View Student

This
is the Instructor’s “View Student” page.
This page displays information on an individual student from the
system’s database and also displays all of the student’s lab grades for the
semester. Each lab grade is displayed as
a link to a page containing a summary of that data.
Student – Main
Page

This is the splash page for
Students. Each of the Student’s pages
will contain all of the same links on the left hand side, and the same footer
on the bottom. Eventually this is the
page that will contain any system updates, reminders, account status updates or
any other news that needs to be presented to the user.
Student –
Change Password
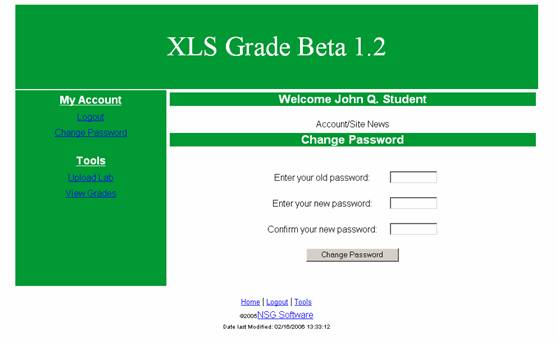
This is the Student’s change password
page. Here the user has the ability to
change their login password for the system.
The user will enter their old (current) password, their new password and
then their new password again as a confirmation. Upon clicking “Change Password” the user will
receive an alert message confirming that their password has been changed. Eventually this will be an encrypted page
(HTTPS), but as of now, it uses simple HTML password input.
Student –
Upload Lab
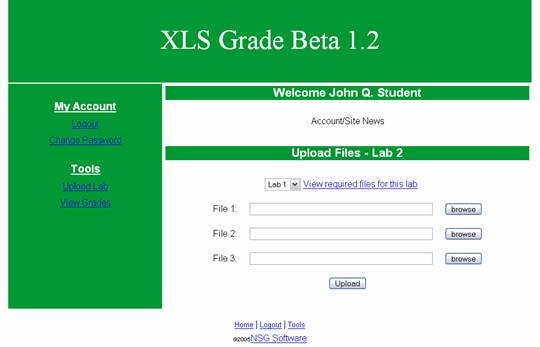
This
is the Student’s “Upload Lab” page. From
this page the user will be able to select a lab and view a popup window that
lists all of the files required for that particular lab. The user can then browse for each of those
files and upload each of them in just one step.
Student – View
Grades
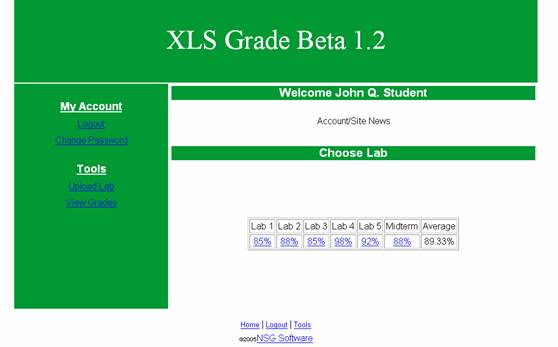
This is the Student’s “View Grades” page. This page gives each student a listing of
each of their lab grades and their average.
Each lab grade is given as a link to a summary/grade sheet of that lab
for that particular student.
Lab
Summary Report
Lab
#__ Summary (For Student)
Name:
_______________________
Lab Time: ___________________
Lab Instructor:
__________________________
Lecture
Instructor:
________________________
Total Points
Received:
__________
Total Possible
Points: ___________
Percentage:
_________%
What Questions
Were Wrong:
(THIS SECTION
IS SHOWN MORE THAN ONCE PENDING ON HOW MANY THE STUDENT
GOT WRONG)
Question: ________________________________
Your Answer:
_____________________________
Correct Answer:
___________________________
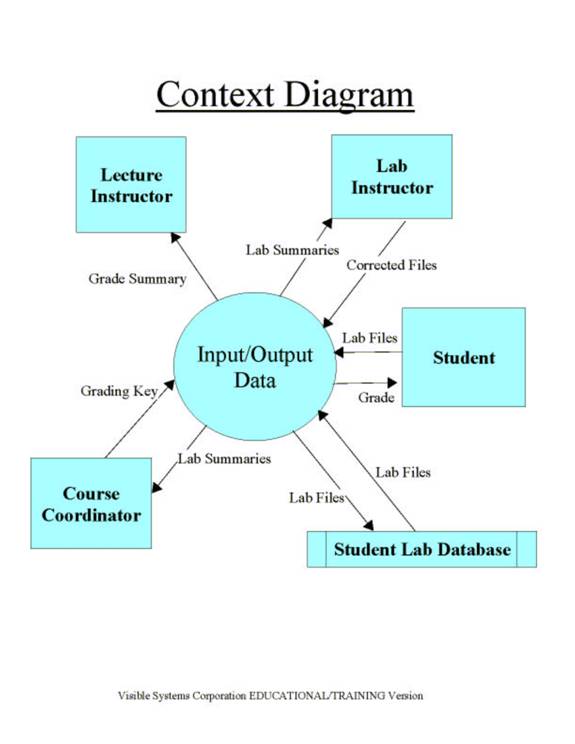
1.3.1:
Context Diagram…………………….....................................33-34
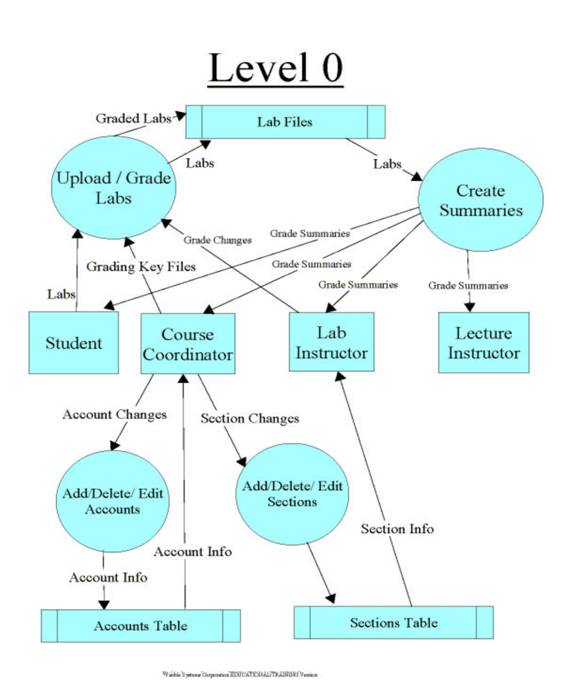
1.3.2:
Level 0 Diagram......................................................................34-38
1.3.3:
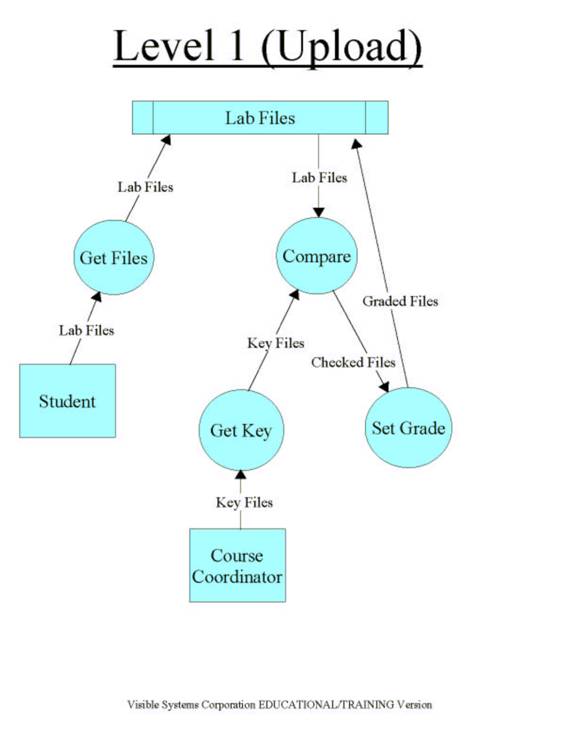
Level 1 (Upload) Diagram…………………………………..38-39
1.3.4:
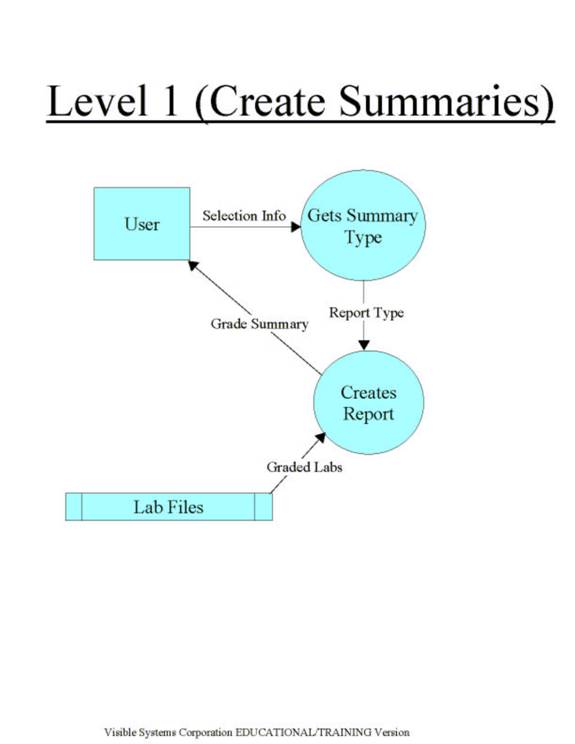
Level 1 (Create Summaries) Diagram ………………………….40
1.3.5:
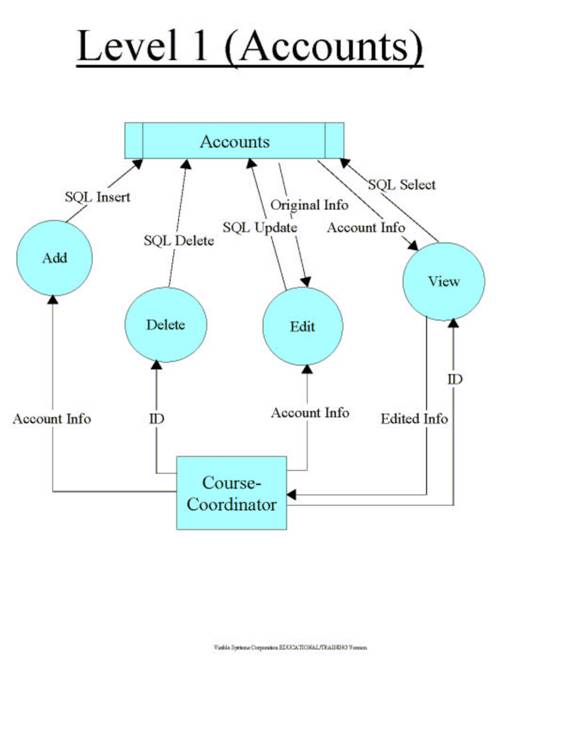
Level 1 (Accounts) Diagram..……………………………….41-42
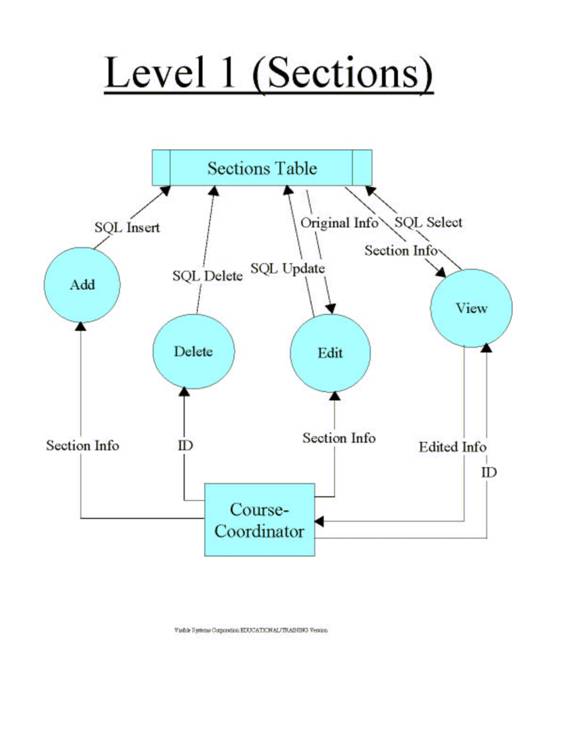
1.3.6: Level 1 (Sections) Diagram………………………………….43-44
1.3.7:
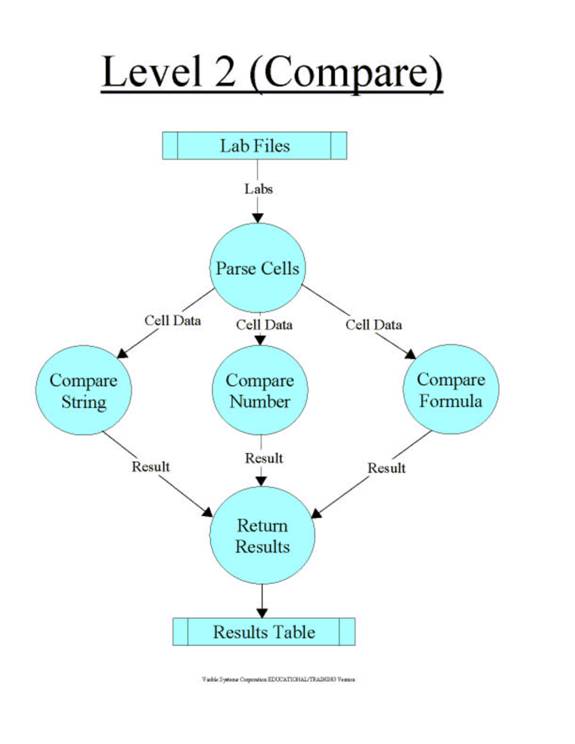
Level 2 (Compare) Diagram…………………………………45-46
1.3.8:
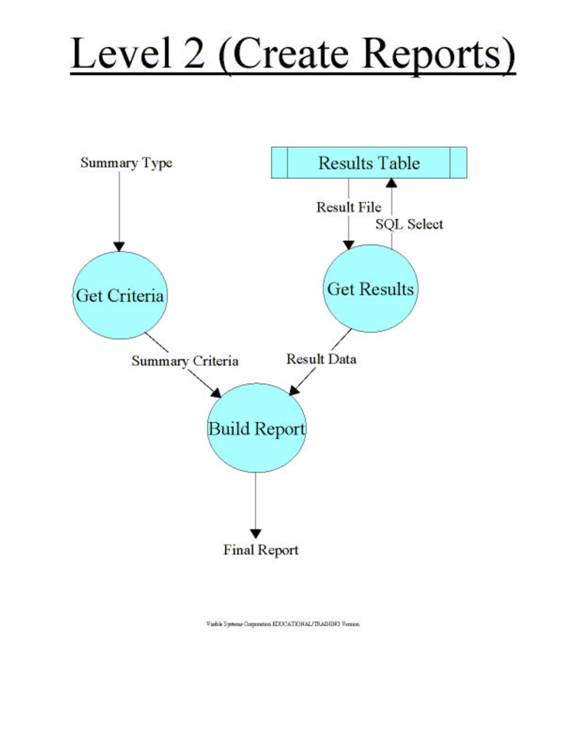
Level 2 (Create Reports) Diagram…………………………..47-48
Data
Flow – Grade Summary
Description: Lecture Instructors can get grade
summaries out of the system.
Source: System (Process)
Destination: Lecture Instructor (Source/Sink)
Data
Flow – Lab Summaries
Description: Lab Instructors can get grade summaries
out of the system.
Source: System (Process)
Destination: Lab Instructor (Data Sink)
Data
Flow – Corrected Files
Description: Lab Instructors can submit corrections
to graded files to the system.
Source: Lab Instructor (Source/Sink)
Destination: System (Process)
Data
Flow – Lab Files
Description: Students submit lab files to the
system.
Source: Student (Source/Sink)
Destination: System (Process)
Data
Flow – Grade Summary
Description: Students can get grade summaries from
the system.
Source: System (Process)
Destination: Student (Data Sink)
Data
Flow – Lab Files
Description: The system gets lab files out of the
lab database.
Source: Student Lab Database (Data Store)
Destination: System (Process).
Data
Flow – Lab Files
Description: The system sends lab files to the lab
database for storage.
Source: System (Process)
Destination: Student Lab Database (Data Store)
Data
Flow – Lab Summaries
Description: The Course Coordinator gets lab
summaries from the system.
Source: System (Process)
Destination: Course Coordinator (Data Sink)
Data
Flow – Grading Key Files
Description: The Course Coordinator submits the key
files to the system.
Source: Course Coordinator (Source/Sink)
Destination: System (Process)
Process – Input/Output Data
Description: Takes labs and keys submitted by the
users, grades the labs and outputs various grading summaries.
Input
Flow: Key files, Lab
Files, Corrected Files
Output
Flow: Grade Summaries,
Lab Summaries, Lab Files
Source/Sink – Lecture Instructor
Description: Instructors who only teach lecture
sections of CSIS 010 or 011.
Input
Flow: Lab Summaries
Output
Flow: none
Source/Sink – Lab Instructor
Description: Instructors who teach lab sections of
CSIS 010 or 011.
Input
Flow: Grade Summaries
Output
Flow: Corrected Files
Source/Sink – Student
Description: Students enrolled in CSIS 010 or 011.
Input
Flow: Grade Summaries
Output
Flow: Lab Files
Source/Sink – Course Coordinator
Description: The coordinator of CSIS 010, Ms. Cotler
Input
Flow: Lab Summaries
Output
Flow: Grading Key Files
Data
Store – Student Lab
Database
Description: The database where all student lab
files are stored.
Input
Flow: Lab Files
Output
Flow: Lab Files
Data
Flow – Labs
Description: The “Create Summaries” process gets lab
files out of the lab database.
Source: Lab Files (Data Store)
Destination: Create Summaries (Process).
Data
Flow – Labs
Description: The system sends lab files to the lab
database for storage.
Source: Upload / Grade Labs (Process)
Destination: Lab Files (Data Store)
Data
Flow – Labs
Description: Students submit lab files to the upload
process.
Source: Student (Source/Sink)
Destination: Upload / Grade Labs (Process)
Data
Flow – Grading Key Files
Description: The Course Coordinator submits the key
files to the upload process.
Source: Course Coordinator (Source/Sink)
Destination: Upload / Grade Labs (Process)
Data
Flow – Grade Summaries
Description: Students can get grade summaries from
the create summaries process
Source: Create Summaries (Process)
Destination: Student (Data Sink)
Data
Flow – Grade Summaries
Description: Lab Instructors can get grade summaries
from the create summaries
process
Source: Create Summaries (Process)
Destination: Lab Instructor (Data Sink)
Data
Flow – Grade Summaries
Description: Lecture Instructors can get grade
summaries from the create
summaries process
Source: Create Summaries (Process)
Destination: Lecture Instructor (Data Sink)
Data
Flow – Grade Summaries
Description: The Course Coordinator can get grade
summaries from the create
summaries process
Source: Create Summaries (Process)
Destination: Course Coordinator (Data Sink)
Data
Flow – Grade Changes
Description: Lab Instructors can submit corrections
to graded files to the system.
Source: Lab Instructor (Source/Sink)
Destination: Create Summaries (Process)
Data
Flow – Account Info
Description: The Course Coordinator gets Account
Information from “Accounts
Table”
Source: Accounts Table (Data Store)
Destination: Course Coordinator (Data Sink)
Data
Flow – Account Changes
Description: The Course Coordinator submits changes
to accounts to the
“Add/Delete/Edit Accounts” process.
Source: Course Coordinator (Source/Sink)
Destination: Add/Delete/Edit Accounts (Process)
Data
Flow – Account Info
Description: The “Add/Delete/Edit Accounts” process
makes changes to accounts and stores them in the “Accounts” table.
Source: Add/Delete/Edit Accounts (Process)
Destination: Accounts Table (Data Store)
Data
Flow – Section Info
Description: The Course Coordinator gets Section
Information from “Sections
Table”
Source: Sections Table (Data Store)
Destination: Course Coordinator (Data Sink)
Data
Flow – Section Changes
Description: The Course Coordinator submits changes
to sections to the
“Add/Delete/Edit Sections” process.
Source: Course Coordinator (Source/Sink)
Destination: Add/Delete/Edit Sections (Process)
Data
Flow – Section Info
Description: The “Add/Delete/Edit Sections” process
makes changes to sections and stores them in “Sections Table.”
Source: Add/Delete/Edit Sections (Process)
Destination: Sections Table (Data Store)
Process – Upload/Grade Labs
Description: Takes labs and keys submitted by the
users, calls the grading functions and submits the labs to “Lab Files”
Input
Flow: Key files, Lab
Files
Output
Flow: Lab Files, Graded Labs
Process – Create Summaries
Description: Gets labs from “Lab Files” and creates
various summaries.
Input
Flow: none
Output
Flow: Grade Summaries
(4)
Process – Add/Delete/Edit Accounts
Description: Gets changes to accounts from the
Course Coordinator and writes them to “Accounts Table.”
Input
Flow: Account Changes
Output
Flow: Account Info
Process – Add/Delete/Edit Sections
Description: Gets changes to sections from the
Course Coordinator and writes them to “Sections Table.”
Input
Flow: Section Changes
Output
Flow: Section Info
Source/Sink – Lecture Instructor
Description: Instructors who only teach lecture
sections of CSIS 010 or 011.
Input
Flow: Grade Summaries
Output
Flow: none
Source/Sink – Lab Instructor
Description: Instructors who teach lab sections of
CSIS 010 or 011.
Input
Flow: Grade Summaries
Output
Flow: Grade Changes
Source/Sink – Student
Description: Students enrolled in CSIS 010 or 011.
Input
Flow: Grade Summaries
Output
Flow: Labs
Source/Sink – Course Coordinator
Description: The coordinator of CSIS 010, Ms. Cotler
Input
Flow: Grade Summaries
Output
Flow: Grading Key Files
Data
Store – Lab Files
Description: The database where all student lab
files are stored.
Input
Flow: Labs
Output
Flow: Labs
Data
Store – Accounts Table
Description: The table where all account information
is stored.
Input
Flow: Account Info
Output
Flow: Account Info
Data
Store – Sections Table
Description: The table where all section information
is stored.
Input
Flow: Section Info
Output
Flow: Section Info
Data
Flow – Lab Files
Description: The “Get Files” process drops labs into
the Lab Files DB.
Source: Get Files (Process)
Destination: Lab Files (Data Store).
Data
Flow – Lab Files
Description: The “Get Files” process drops labs into
the Lab Files DB.
Source: Lab Files (Data Store).
Destination: Compare (Process)
Data
Flow – Lab Files
Description: The “Get Files” process gets labs from
Student users.
Source: Student (Source/Sink)
Destination: Get Files (Process)
Data
Flow – Key Files
Description: The “Compare” process gets key files
from the Course Coordinator.
Source: Course Coordinator (Source/Sink)
Destination: Compare (Process)
Data
Flow – Checked Files
Description: The “Compare” process sends checked
files to the “Set Grade” process.
Source: Compare (Process)
Destination: Set Grade (Process)
Data
Flow – Graded Files
Description: The “Compare” process drops graded
files into the Lab Files DB.
Source: Set Grade (Process)
Destination: Lab Files (Data Store).
Data
Flow – Key Files
Description: The “Get Key” process gets key files
from the Course Coordinator.
Source: Course Coordinator (Source/Sink)
Destination: Get Key (Process)
Process – Get Files
Description: Gets Lab files submitted by students
Input
Flow: Lab Files
Output
Flow: Lab Files
Process – Compare
Description: Gets labs from “Lab Files,” checks them
against the key files and submits the results to “Set Grade.”
Input
Flow: Lab Files, Key
Files
Output
Flow: Checked Files
Process – Get Key
Description: Gets key files submitted by the Course
Coordinator.
Input
Flow: Lab Files
Output
Flow: Lab Files
Process – Set Grade
Description: Gets checked files from the “Compare”
process, sets the grade for the lab, and drops the graded file into “Lab
Files.”
Input
Flow: Checked Files
Output
Flow: Graded Files
Source/Sink – Student
Description: Students enrolled in CSIS 010 or 011.
Input
Flow: none
Output
Flow: Lab Files
Source/Sink – Course Coordinator
Description: The coordinator of CSIS 010, Ms. Cotler
Input
Flow: none
Output
Flow: Key Files
Data
Store – Lab Files
Description: The database where all student lab
files and graded files are stored.
Input
Flow: Lab Files
Output
Flow: Lab Files
1.3.4. Level 1 (Create Summaries)
Data
Flow – Selection Info
Description: The user selects a type of summary
which is sent to “Get Summary Type.”
Source: User (Source/Sink)
Destination: Get Summary Type (Process)
Data
Flow – Report Type
Description: The type of report that is to be
produced.
Source: Get Summary Type (Process)
Destination: Create Reports (Process)
Data
Flow – Grade Summary
Description: Summaries are sent from “Create Report”
to “User.”
Source: Create Report (Process)
Destination: User (Source/Sink)
Data
Flow – Graded Labs
Description: The “Create Report” process gets labs
from “Lab Files.”
Source: Lab Files (Data Store)
Destination: Create Report (Process)
Process – Get Summary Type
Description: Gets a selection from the user and
determines which type of summary should be created.
Input
Flow: Selection Info
Output
Flow: Report Type
Process – Create Report
Description: Gets the summary type from “Get Summary
Type” and creates the proper summary from the graded labs in “Lab Files”
Input
Flow: Report Type,
Graded Labs
Output
Flow: Grade Summary
Data
Store – Lab Files
Description: The database where all student lab
files and graded files are stored.
Input
Flow: none
Output
Flow: Lab Files
Source/Sink – User
Description: Represents all users of the system.
Input
Flow: Grade Summaries
Output
Flow: Selection Info
Data
Flow – SQL Insert
Description: The sql statement to add a section.
Source: Add (Process)
Destination: Sections Table (Data Store)
Data
Flow – SQL Delete
Description: The sql statement to delete a section
Source: Delete (Process)
Destination: Sections Table (Data Store)
Data
Flow – SQL Update
Description: The sql statement to update a section
Source: Edit (Process)
Destination: Sections Table (Data Store)
Data
Flow – SQL Select
Description: The sql statement to view a section
Source: View (Process)
Destination: Sections Table (Data Store)
Data
Flow – Original Info
Description: Section info is taken from “Sections
Table” by the “Edit” process.
Source: Sections Table (Data Store)
Destination: Edit (Process)
Data
Flow – Section Info
Description: Section info is taken from “Sections
Table” by the “View” process.
Source: Sections Table (Data Store)
Destination: View (Process)
Data
Flow – Section Info
Description: The Id of the section to be added.
Source: Course Coordinator (Source/Sink)
Destination: Add (Process)
Data
Flow – ID
Description: The Id of the section to be deleted.
Source: Course Coordinator (Source/Sink)
Destination: Delete (Process)
Data
Flow – Section Info
Description: The Id of the section to be edited.
Source: Course Coordinator (Source/Sink)
Destination: Edit (Process)
Data
Flow – ID
Description: The Id of the section to be viewed.
Source: Course Coordinator (Source/Sink)
Destination: View (Process)
Data
Flow – Section Info
Description: Section info to be outputted to the
user.
Source: View (Process)
Destination: Course Coordinator (Source/Sink)
Process – Add
Description: Gets section info from the Course
Coordinator and adds it to “Sections Table.”
Input
Flow: Section Info
Output
Flow: SQL Insert
Process – Delete
Description: Gets the ID of the section to be
deleted.
Input
Flow: ID
Output Flow: SQL Delete
Process – Edit
Description: Gets edited section information from
the user and updated the table accordingly.
Input
Flow: Section Info
Output
Flow: SQL Update
Process – Create Report
Description: Outputs section information from
“Sections Table” to the user.
Input
Flow: ID, Section Info
Output
Flow: Section Info, SQL
Select
Source/Sink – Course Coordinator
Description: The coordinator of CSIS 010, Ms. Cotler
Input
Flow: Section Info
Output
Flow: Section Info, ID,
Section Info, ID
Data
Store – Sections Table
Description: The table where all section information
is stored.
Input
Flow: SQL Insert, SQL
Delete, SQL Update, SQL Select
Output
Flow: Original Info,
Section Info
Data
Flow – SQL Insert
Description: The sql statement to add an account.
Source: Add (Process)
Destination: Accounts Table (Data Store)
Data
Flow – SQL Delete
Description: The sql statement to delete an account.
Source: Delete (Process)
Destination: Accounts Table (Data Store)
Data
Flow – SQL Update
Description: The sql statement to update an account.
Source: Edit (Process)
Destination: Accounts Table (Data Store)
Data
Flow – SQL Select
Description: The sql statement to view an account.
Source: View (Process)
Destination: Accounts Table (Data Store)
Data
Flow – Original Info
Description: Account info is taken from “Accounts
Table” by the “Edit” process.
Source: Accounts Table (Data Store)
Destination: Edit (Process)
Data
Flow – Account Info
Description: Account info is taken from “Accounts
Table” by the “View” process.
Source: Accounts Table (Data Store)
Destination: View (Process)
Data
Flow – Account Info
Description: The Id of the account to be added.
Source: Course Coordinator (Source/Sink)
Destination: Add (Process)
Data
Flow – ID
Description: The Id of the account to be deleted.
Source: Course Coordinator (Source/Sink)
Destination: Delete (Process)
Data
Flow – Account Info
Description: The Id of the account to be edited.
Source: Course Coordinator (Source/Sink)
Destination: Edit (Process)
Data
Flow – ID
Description: The Id of the account to be viewed.
Source: Course Coordinator (Source/Sink)
Destination: View (Process)
Data
Flow – Account Info
Description: Account info to be outputted to the
user.
Source: View (Process)
Destination: Course Coordinator (Source/Sink)
Process – Add
Description: Gets account info from the Course
Coordinator and adds it to “Accounts Table.”
Input
Flow: Account Info
Output
Flow: SQL Insert
Process – Delete
Description: Gets the ID of the account to be
deleted.
Input
Flow: ID
Output Flow: SQL Delete
Process – Edit
Description: Gets edited account information from
the user and updates the table accordingly.
Input
Flow: Account Info
Output
Flow: SQL Update
Process – Create Report
Description: Outputs section information from
“Accounts Table” to the user.
Input
Flow: ID, Account Info
Output
Flow: Account Info, SQL
Select
Source/Sink – Course Coordinator
Description: The coordinator of CSIS 010, Ms. Cotler
Input
Flow: Account Info
Output
Flow: Account Info, ID,
Accounts Info, ID
Data
Store – Accounts Table
Description: The table where all account information
is stored.
Input
Flow: SQL Insert, SQL
Delete, SQL Update, SQL Select
Output
Flow: Original Info,
Section Info
Data
Flow – Labs
Description: Labs are taken from “Lab Files” by the
“Parse Cells” process.
Source: Lab Files (Data Store)
Destination: Parse Cells (Process)
Data
Flow – Cell Data
Description: Parsed out strings are sent to “Compare
String.”
Source: Parse Cells (Process)
Destination: Compare String (Process)
Data
Flow – Cell Data
Description: Parsed out strings are sent to “Compare
Number.”
Source: Parse Cells (Process)
Destination: Compare Number (Process)
Data
Flow – Cell Data
Description: Parsed out strings are sent to “Compare
Formula.”
Source: Parse Cells (Process)
Destination: Compare Formula (Process)
Data
Flow – Result
Description: Results of the individual compare
function are sent to “Return Results”.
Source: Compare String (Process)
Destination: Return Results (Process)
Data
Flow – Result
Description: Results of the individual compare
function are sent to “Return Results”.
Source: Compare Number (Process)
Destination: Return Results (Process)
Data
Flow – Result
Description: Results of the individual compare
function are sent to “Return Results”.
Source: Compare Formula (Process)
Destination: Return Results (Process)
Data
Flow – SQL Insert
Description: The sql statement to insert results
into “Results Table.”
Source: Return Results (Process)
Destination: Results Table (Data Store)
Process – Parse Cells
Description: Gets Labs and calls the java functions
to parse information out of individual cells.
Input
Flow: Labs
Output
Flow: Cell Data
Process – Compare String
Description: Compares cell data from student labs to
the corresponding data from the grading keys.
Input
Flow: Cell Data
Output Flow: Result
Process – Compare Number
Description: Compares cell data from student labs to
the corresponding data from the grading keys.
Input
Flow: Cell Data
Output Flow: Result
Process – Compare Formula
Description: Compares cell data from student labs to
the corresponding data from the grading keys.
Input
Flow: Cell Data
Output Flow: Result
Process – Return Results
Description: Takes the results of the compare
functions and inserts them into “Results Table”
Input
Flow: Result
Output Flow: SQL Insert
Source/Sink – Course Coordinator
Description: The coordinator of CSIS 010, Ms. Cotler
Input
Flow: Account Info
Output
Flow: Account Info, ID,
Accounts Info, ID
Data
Store – Lab Files
Description: The table where all Lab Files are
stored
Input
Flow: none
Output
Flow: Labs
Data
Store – Results Table
Description: The table where all graded results are
stored.
Input
Flow: SQL Insert
Output
Flow: Results Info
1.3.8. Level 2 (Create Reports)
Data
Flow – Summary Type
Description: The type of summary to be created.
Source: Get Summary Type (Process)
Destination: Get Criteria (Process)
Data
Flow – Result Info
Description: Graded results from the “Result Table.”
Source: Results Table (Data Store)
Destination: Get Results (Process)
Data
Flow – SQL Select
Description: SQL Select statement to get result
data.
Source: Get Results (Process)
Destination: Results Table (Data Store)
Data
Flow – Summary Criteria
Description: The criteria to base the summary on.
Source: Get Criteria (Process)
Destination: Build Report (Process)
Data
Flow – Result Data
Description: The graded results from “Get Results.”
Source: Get Results (Process)
Destination: Build Report (Process)
Data
Flow – Final Report
Description: The final report produced by “Build
Report.”
Source: Build Report (Process)
Destination: User (Source/Sink)
Process – Get Criteria
Description: Gets summary type and sends the report
criteria (template) to “Build Report.”
Input
Flow: Summary Type
Output
Flow: Summary Criteria
Process – Get Results
Description: Uses SQL to get results from “Results
Table,” and sends that data to “Build Report.”
Input
Flow: Result Info
Output
Flow: SQL Select, Result
Data
Process – Build Report
Description: Builds the grading summaries based on
“Summary Criteria” and “Result Data.”
Input
Flow: Summary Criteria,
Result Data
Output
Flow: Final Report
Data
Store – Results Table
Description: The table where all graded results are
stored.
Input
Flow: SQL Select
Output
Flow: Result Info
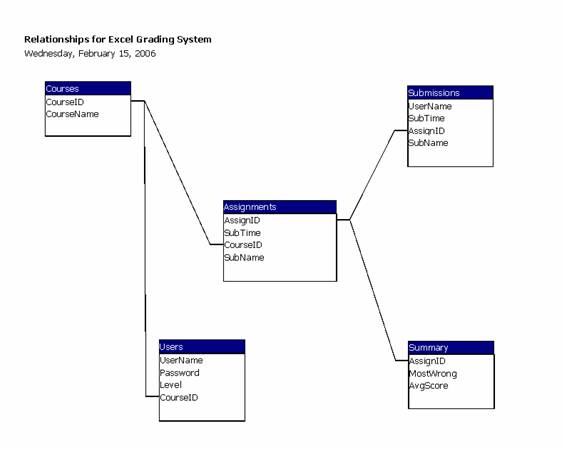
1.4.1. Assignments
Table
Column Name |
Type |
Nulls |
Column Comments |
|
AssignId |
Text |
NO |
Each assignment receives an ID to
distinguish between them. |
|
SubTime |
Number |
YES |
The time and date the assignment was
submitted. |
|
CourseId |
Number |
YES |
Unique ID assigned to each lab section. |
|
SubName |
Text |
YES |
Name of the submitted assignment |
1.4.2.
Sections Table
|
Column Name |
Type |
Nulls |
Column Comments |
|
CourseId |
Text |
NO |
Unique ID assigned to each lab section. |
|
CourseName |
Text |
YES |
Section number assigned to the course |
1.4.3.
Lab Files Table
|
Column Name |
Type |
Nulls |
Column Comments |
|
UserName |
Text |
YES |
Unique name given to each user for
login |
|
SubTime |
Number |
YES |
The time and date the assignment was
submitted. |
|
AssignId |
Number |
YES |
Each assignment receives an ID to
distinguish between them. |
|
SubName |
Text |
NO |
Name of the submitted assignment |
1.4.4.
Results Table
|
Column Name |
Type |
Nulls |
Column Comments |
|
AssignId |
Text |
NO |
Each assignment receives an ID to
distinguish between them. |
|
MostWrong |
Number |
YES |
Tells which questions were marked wrong
the most frequently. |
|
AvgScore |
Number |
YES |
Average score of the files that were
submitted and graded. |
1.4.5.
Accounts Table
|
Column Name |
Type |
Nulls |
Column Comments |
|
UserName |
Text |
NO |
Unique name given to each user for
login |
|
SubTime |
Text |
YES |
Password needed to enter the system. |
|
Level |
Text |
YES |
Level determines what the users has
access to. Ex) student, course coordinator |
|
LecSection |
Text |
YES |
Unique ID assigned to each lecture
section |
|
LabSection |
Text |
YES |
Unique ID assigned to each lab section. |
1.5: Entity-Relationship Diagram
Section
2: Architectural Design Specification
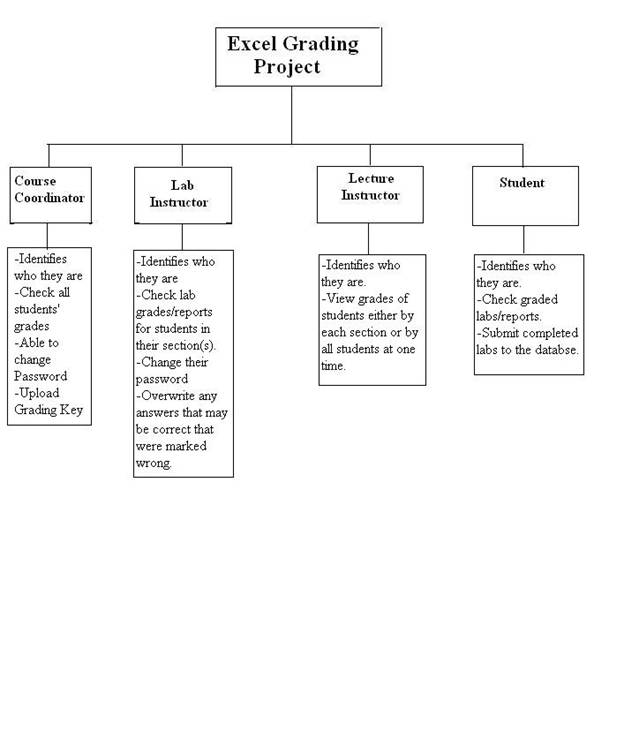
2.2.1. Definition
A use-case describes
how the system responds to the requests of different actors. These actors are the course coordinator, the
student, the lab instructor and the lecture instructor. Each story, or narrative, demonstrates the
users capabilities and privileges. The use-cases for our four actors are below.
2.2.2.
Use-Case for the Course Coordinator (Administrator):
1.
The
Course Coordinator logs into the same web interface as all other users of the
system. Upon visiting the webGUI and attempting a login, an authentication method
will be in place to assure the validity of the username and password. In
addition, authentication module will keep a running tally of failed logins, in
case of an attempted break-in.
2.
The
Course Coordinator, once logged into the system, will have the ability to add
new users to the system, as well as manage existing users. The admin will be
able to set access privileges over the student, lab instructor, and lecture
instructor accounts. The Course Coordinator will also be able to create a list
of assignments for each lab section. In addition, the Course Coordinator will
submit some form of grading key which the software will use in grading student
submitted files. Finally, the Course Coordinator will have the ability to view
some type of grading summary if they so choose.
3.
The
Course Coordinator will have the ability to change their own password if they
wish. They will be able to do this from the webGUI.
4.
The
Course Coordinator will have the ability to logout safely to protect their
account from accidental access by other users using the same computer system.
2.2.3. Student
Use-Case:
1.
The student is
a person registered in a lab for either CSIS-010 or CSIS-011. The student will go to the main login screen
and enter the username and password that will be issued by the Course
Coordinator.
2.
Once logged in
the student has a couple of options. The
student may submit the lab files that may be due for that week by clicking a
button that would help to navigate through the computer and find all the needed
files for that lab. Once all files have
been located, the student may then submit the lab.
3.
The student
may then choose to logout or check for labs that have been graded so far. For each lab that is graded a summary sheet
will be available to tell the student with information such as what grade was
received and what was done wrong along with all the examples that were
completed incorrectly. The student may
also view a summary of every lab that has been completed earlier in the semester
as well. As a last option, the student
may change the password that gives access to the account once the student has
logged in at least once.
2.2.4.
Use- Case for the Lab Instructor (Grader):
·
The
lab instructor logs into the system through the web interface by entering their
unique user name and password. If the
lab instructor fails to enter in the correct password 3 times in a row, the
system will lock them out for security purposes. Once the lab instructor has
logged in successfully, they will see the home welcome page.
·
The
lab instructor can view lab reports that have been submitted by students and
also student information, like section number and lecturer. They can look up
the student by section or by name from the drop down list. The lab instructor can also view the
generated grade reports, which is a summary of all grades given. The lab instructor can view the reports by
grades of the whole section or by each question. The lab instructor has the authority to
change grades that are correct but the system did not mark wrong. For example formulas in a cell can be entered
in a number of different ways. The
system may mark it wrong because it was not exact to the key, but it could
still be correct.
·
The
lab instructor has the ability to override the grading system in order to
change a grade. In order to do this the
lab instructor must look at the grade reports and make the necessary
changes. The system will allow this
because the Lab instructor has this privilege of changing grades and would
recognize that from their unique login.
·
After
the lab instructor has graded the labs, the summary reports are sent back to
the server to be stored.
2.2.5.
Use- Case for the Lecture Instructor:
1.
The lecture
instructor is a person who teaches the lecture section of either CSIS-010 or
CSIS-011. The Lecture Instructor will go
to the main login screen and enter the username and password that will be
issued by the Course Coordinator.
2.
The
lecture instructor chooses a lab or lecture (if they have more than one). The main function that the lecture instructor
is able to do is to view grades and grading summaries about their students.
3.
In
order for the lecture instructor to view grades, Excel labs for the
instructor’s class must be uploaded and graded.
The lecture instructor can then choose to view a list of individual
grades or chooses from various summaries.
4.
The
lecture instructor has the option of viewing and/or printing the selected
reports
5.
Lastly,
the lecture instructor logs out and closes the web page.
In
our software, there are three main parts that our clients will interact with on
a regular basis, whether they realize it or not. These three parts are the parser, the
database, and the interface.
2.3.1. Parser:
In our
software project the major inner workings will consist of the parser. What the parser will be able to do is, given
a correct excel spreadsheet and a student excel spreadsheet, parse out
corresponding information from each spreadsheet, compare the two spreadsheets
to see what the student got correct and what they also got wrong. The way the parser works is that since it is
being written in java, libraries exist that have functions that enable the
picking of a particular cell or area of a spreadsheet and keep track of its
characteristics in some data-type, most likely a string. The parser will do this for both the
student’s spreadsheet and the correct spreadsheet. When this is done the two strings are
compared to see if they match. If they
do match then the student’s answer is correct and if it doesn’t match then the
answer is incorrect. Certain cell types,
such as formulas and graphs, will be flagged for review by the lab instructor.
2.3.2. Database:
There will
also be a database in our system that will organize into tables the information
of every user of the system. This
includes all students in CSIS 010 and 011, and all lab and lecture instructors
of those courses. The students will be
separated by which lab and lecture sections they are in so that way their
respective instructors may access each student’s information easily. Each student will have information such as
their SID numbers, lab section, lecture section, submitted labs, and
grades. This database will also contain
information about previous semesters as time goes on. The purpose of this is that in case something
in the past needs to be checked, a faculty member may look in the database for
whatever they need.
2.3.3. Interface:
The system website
is going to be the interface that both the students and faculty members will be
interacting with on a regular basis.
This system will be required to output the following grading summaries:
·
Single lab for
a single student.
·
All labs for a
single student.
·
Grades for a
single lab for a single section.
·
Grades for all
labs for a single section.
·
Averages for
all labs for all sections.
·
Grades for a
single question for a single section.
·
Grades for a
single question for all sections.
Students will
be able to log in and then either view their grades or submit any lab files
that they may have, as long as it is not passed the designated deadline. Instructors will be able to view every
student’s grades and information. The
Course Coordinator will be able to upload a grading key, manage all user
accounts, view every student’s grades like the Instructors, and any small loose
ends that may be taken care of by an administrator. For each action there will be a different
web-page that the user will see.
Computers
used for development
·
Dell dimension 4550
o Windows
XP Home Edition Service Pack 2
o 2.4
GHz Pentium 4
o 37
GB Hard Drive
o 512
MB RAM
·
Gateway PC
o Windows
2000 Service Pack 3
o 1.3
GHz Pentium 4
o 35
GB Hard Drive
o 654
MB RAM
· Web Server
o Oraserv 2.4.21-4.el.
o Apache 2.0.46
o PHP 4.3.11
o MySQL 4.1.14
· Our system will be tested on Internet Explorer, Firefox, Opera and AOL web browsers.
The manner in which we are developing our software allows for our software to be platform independent. This means that no matter what the machine a person is using, they will be able to perform all the tasks that they desire. There are only a few small requirements that our software will need on each computer.
· Any common web browser.
· Minimum of 10MB free Hard Drive space (for a Java Applet).
· Java Runtime Environment (we may have Java installed on our server so that the user will not need to have it running on their machine).
Section
3: Detailed Design Specification
3.1: Documentation Prologue for each Routine
3.1.1. Function cellType
Input: Cell
Output: String
This function takes the input of a cell type(defined by the jexcelapi documentation) and outputs a descriptive string based on what type of cell this is. Different cells include numerical, formulas, images, etc.
3.1.2. Function cellFont
Input: Cell
Output: String
This function takes the input of a cell type(defined by the jexcelapi documentation) and outputs a descriptive string of what font is being used in this cell. It can possibly return any font installed on the source computer where the excel file was created.
3.1.3. Function cellData
Input: Cell
Output: String
This function calls the celltype function to retrieve what type of cell it is, and then from there determines how it will handle the data and which data type it should expect.
3.1.4. Function isItalic
Input: Cell
Output: boolean
This function determines whether the
given cell has italic formatting applied to it. It will return a yes or no
value.
3.1.5. Function isBold
Input: Cell
Output: boolean
This function determines whether the given cell has bold formatting applied to it. It will return a yes or no value.
3.1.6. Function fontSize
Input: Cell
Output: boolean
This function determines whether the given cell has bold formatting applied to it. It will return a yes or no value.
3.1.7. Function c
Input: String
Output: Integer
This function takes input of a string representing the row or column inside an excel spreadsheet, and converts it into a usable integer for our other functions.
3.1.8. Function debug
Input: none
Output: none
This function simply debugs the application by running through all possible of the above functions and displaying their output.
3.1.9. Function main
Input: two Strings
Output: none
This function controls the other functions in the program. It takes as input the row and the column, and runs the appropriate checks. Currently the key file is hard coded, but that will be changed.
3.2: Pseudocode for each Routine
3.2.1. Function cellType
Create a new string type variable.
Set the string type equal to the cell getType function for the given cell.
Use the internal method to convert the result to a string
Return the string.
3.2.2. Function cellFont
Create a new string type variable.
Set the string equal to the cell, using the built in getCellFormat method, followed by the getFont method, and finally followed by the getName method to convert the final result into a string.
3.2.3. Function cellData
Create a new string type variable.
If the cell type for the given cell
is a formula, use the formula data accessor method.
otherwise, use the default data accessor method
Cast to a string type.
3.2.4. Function isItalic
Create a new Boolean type variable.
Set the boolean equal to the cell, using the built in getCellFormat method, followed by the getFont method, and finally followed by the isItalic method to return a Boolean value.
3.2.5. Function isBold
This function determines whether the given cell has bold formatting applied to it. It will return a yes or no value.
3.2.6. Function fontSize
Create a new integer variable.
Set the integer equal to the cell, using the built in getCellFormat method, followed by the getFont method, and finally followed by the getPointSize method to return an int value.
3.2.7. Function c
Create a new integer variable.
Set the integer value equal to the length of the input string.
Run a function if necessary to make sure all the characters in the string are lower case.
Convert the character, or characters back into their numerical equivalent.
Set the integer variable equal to the character value.
Return the final integer value.
3.2.8. Function debug
Run each of the above functions once, and output the data.
3.2.9. Function main
Open up an input stream to read in the file from one of the given arguments.
Send the other argument to be parsed by the c function, to grab appropriate row/column data.
Open up the workbook using the workbook accessor method, and select the appropriate sheet.
Determine which tests would be most appropriate, and run those tests on the given cell data.
NSG Software Development will install its XLS Automatic Excel Grading System and all necessary files onto the Siena College Computer Science Department’s web server, Oraserv. For easy movement of the application in the future, all of the path extensions will be relative, rather than absolute. There will then be a web address supplied for users to access our program.
A CD-ROM including the application, all documents, and all presentations, will be given to our clients, Dr. Hunter and Ms. Cotler as a backup.
Section
4: Testing Requirements
4.1.1
Test
plan identifier…………………………………….62
4.1.2
References…………………………………………….62
4.1.3
Introduction…………………………………………...62
4.1.4 Test items………………………………………....62-63
4.1.5 Software risk
issues…………………………………...63
4.1.6 Features to be tested…………………………………..64
4.1.7 Features not to be
tested………………………………64
4.1.8 Approach…………………………………………..64-65
4.1.9 Item pass/fail criteria……………………………….. ...65
4.1.10 Suspension criteria and resumption requirements…65-66
4.1.11 Test deliverables………………………………………66
4.1.12 Remaining test tasks…………………………………..66
4.1.13 Environmental Needs…………………………………66
4.1.14 Staffing and training needs…………………………...67
4.1.15 Responsibilities……………………………………….67
4.1.16 Schedule…………………………………………...67-68
4.1.17 Planning risks and contingencies……………………..68
4.1.18 Approvals…………………………………………68-69
4.1.19 Glossary………………………See
Glossary on page 104
4.1.20 Unit Tests…………………………………………70-103
This
test plan is version 1, revision 0 of the test plan for our current software
package (version 1, revision 2). Each version of our software follows the
versioning technique that major updates to the underlying excel file decoding
software warrants a new, full software version. Each update to the GUI, or
other superficial changes warrant a new subversion or revision number.
Currently this document is backed by the following documents:
· Software plan – version 1.0
· Requirements specification – version 1.0
· Preliminary Design – version 1.0.
· All of which can be found under the “documents” link of the NSG Software Development homepage.
This document is the first revision and overview of the test plan, labeled version 1.0. This test plan is intended to review the various inner workings of the Excel grading software and test these inner workings to insure that they are working properly. Each of the previous documents outlines the steps taken to make sure that proper procedures were followed to create the software and reduce the amount of testing necessary. This plan covers all necessary testing of internal software components and the interface design issues present in our software.
·
The portion of
our software that will require the most intensive testing would be the testing
of the parser. This part of the software will be checking
hundreds of weekly labs for font, formulas, etc. to see if they are in the
correct format. Functions used in the
parser include:
o Font
Type
o Font
size
o Bold
o Italics
o Does
the cell contain a formula?
o Result
of the formula.
o The
formula itself.
·
The database
that will contain all of the required information for each student enrolled in
a CSIS-010 lab or teacher who is teaching a CSIS-010 lab or lecture. This database will contain the lab files and
grades for each student throughout the entire semester.
·
Every link,
button, text box, drop-down menu, etc. on each page will need to be tested to
ensure that the correct page will come up or that the appropriate action takes
place. For example, if a students clicks
the submit button in order to submit a lab, we will need to check if the lab
has been added to the database in the correct place and the appropriate page
will come up afterwards.
·
Since our
software is being used to correct spreadsheets from a third party software
developer, our team needs to know what version of software our clients will be
using in order to ensure that our product will work correctly until our clients
decide to change their spreadsheet software.
Since we know that our clients have recently updated to Microsoft Office
2003 we can assume that they will continue with that version for an extended
period of time.
·
Since our
software is going to be used via the internet, we have to take in account all
of the different types of browsers and the different versions there are
available to our clients and also which ones they will be using.
·
One of the
main goals as a team is to create a piece of software that will be as easy to
use as possible. We want our software to
be self explanatory so that any faculty member or student will be able to
easily figure out how to use it.
·
The most
complex functions that our software will have are the parser’s functions which
grab information from the spreadsheet that is given and check it against the
key that the Course Coordinator will
create for each lab. The parser will
pick up what each cell needs to look like and will tell whether or not the
input that was given by the student is correct or not.
·
If we have
trouble with a particular aspect of our software we will first attempt to fix
it, but if after a long span of time we cannot get it correct we will discuss
options with our clients to solve the problem in an appropriate manner.
·
In order to
make corrections easier when testing our software, we must document our code so
that it will be easier to find a section of code and then fix the problem
within that section.
·
In order to
help the process of creating the software and to ensure a better product we
will continuously be meeting with our clients and we will discuss our testing
progress. If there are problems we will
discuss possible solutions and also discuss which aspects of our software are
working correctly at the time.
The features that need to be tested
from the user’s viewpoint
are functions that need to work correctly in order for the software to work
smoothly according to the user. Each
function will also receive a level at which a feature is at risk of not working
correctly. Such a reason for this is
because the level of complexity in which the code is written. Such parts of the software that will be
tested are the navigation through interface
and the submission of labs by students.
The main thing is to make sure that the interface of web-pages flows
correctly. When a certain link is
clicked by a user to change their password, the appropriate page should display. This type of result is expected so that the
user may use our software flawlessly and easily.
4.1.7.
Features Not To Be Tested
There are not
any features that aren’t going to be tested by our team. Every function that is being implemented into
our software is needed by our clients.
There are not any functions that can take a back seat in order to have
our product be available by a certain time.
Everything that we want to put into the software must work correctly and
accordingly.
Our approach
will be the overall way in which we conduct our testing of the software we are
currently creating. The goal of our
software is to make our clients’ job as easy as possible and to also make our
software as easy to understand as possible.
That is why we are not including any special tools that our clients will
need to learn in order to operate our software.
The way in
which configurations will be handled is by having the Course Coordinator be
able to do everything. For example, the
Course Coordinator will be able to manipulate the enrollment of each lecture
and lab for the CSIS-010 course. This
change in enrollment would manipulate the database that we will create and the
Course Coordinator will be the only person able to perform this action. Every privilege that each user has will be
tested in its entirety including lab submission, grading, viewing a grades, and
many other privileges.
The hardware
that this software will run on doesn’t matter in the least. This is a purely web based program that only
depends the browser that the interface is being accessed through. Throughout the entire testing process our
team will go back and correct any problems that have occurred. As a result regression testing will certainly be conducted. As of how much regression testing will be
done is unsure at this moment because we
are unsure of what parts of our software is not working correctly at this point
in our development. As problems arise,
we will assess them and correct them accordingly. If there are any problems we will discuss the
problem along with its possible solutions with our clients in order to solve it
in a matter that best fits their needs.
In order to
test certain aspects of our code though, other parts will need to be implemented
as well. For example, when testing the
parser we will need to have a section of code that will read in the answer key
and another section that will compare the key to the actual data on the
submitted lab.
In our weekly
meetings we will discuss our progress throughout out development and testing
stages of our software development. We
will ask for advice and also ask our clients what they would like their
software to do if a problem or a special circumstance arises. The main thing is a constant communication
between us and our clients to ensure that we are understanding each other
correctly in order to produce the product that they desire.
4.1.9. Item Pass/Fail
Criteria
·
Functions
– Each function will be passed if it produces the expected output each
and every time it is tested. Each
function will be tested on various types of data contained within various types
of cells. The exact data to which each
function will be tested on and the number of tests to be performed will be
determined at a later date. Minor errors
or warnings within the code will be allowed for, so long as the desired output
is still produced.
·
GUIs – Each GUI will be passed if
each individual test case for that interface produces the expected
results. Individual test cases for each
GUI will include tests on all links, buttons, text boxes, drop-down menus and
any other means of user input in that interface. A GUI will still be passed if there are minor
defects in the code, so long as all means of input and output are working properly
·
Master Test Plan – The master test
plan will be passed if and only if all lower level test plans (unit
tests) are completed and passed. Any
lower level plan that fails will result in a new version of that module which
will then again be subjected to the original test plan for that module.
4.1.10. Suspension Criteria
and Resumption Requirements
Criteria for suspension of testing in specified areas:
·
Unit
tests on GUI’s
o
If the
main function of the page fails to produce the expected output or produces a
fatal error. Testing will then resume
when the error is presumed to be fixed.
o
Testing
will not be stopped on an individual GUI if a link is broken or pointed to the
wrong page. The failure will be recorded
and fixed when the test is complete
·
Unit
tests on functions
o
If the
function encounters a fatal error or produces unexpected output, testing will
be suspended.
o
Testing
on functions will not resume until all fatal errors are fixed and the output
appears to be correct.
The following items will be delivered as part of this test plan.
·
Test plan
document
·
Test plan cases.
The following items may be delivered as part of the final test plan.
Exact specification of the final test plan will be determined at a later date.
· Test plan document
· Test plan cases.
· Tools and their outputs.
·
Simulators
· Static and dynamic generators.
· Error logs and execution logs.
· Problem reports and corrective actions.
At this stage of the development process there are many parts of the XLS Grading System that have not been created and/or implemented and so cannot be tested. Among these are the functions named in the unit tests to be called when a specified button is pressed. These functions have not been implemented and so the GUI’s will only be tested on whether or not they call those functions, not what the function is intended to return. Many of the functions used in parsing an excel file are included in our test plan, but many others have not been written and implemented yet, and so will not be tested at this time. In addition, there may be more GUI’s and functions written at a later date, for which test plans will be written at that time.
· Each of our GUI’s, being htm, html and php files, will be tested in Microsoft Internet Explorer, Mozilla Firfox, and AOL Browser. These files will be hosted on the Siena College Computer Science Department’s Oraserv web server, which runs Apache 2.0.46 with PHP 4.3.11.
· The java applet that will implement all of our functions to parse Excel files will be tested in Java Runtime Environment 5.0 Update 6.
· All other functions will be written and tested in
4.1.14. Staffing and Training Needs
Training on the Application & System
· Ms. Cotler and Dr. Hunter will require minimal training if any with the system, due to its user-friendliness. They have been involved with the design and development as well as refining the functional requirements and interaction with the GUI’S for the system. Little training will be required to show our clients the full capabilities of the system.
· Other than our clients, the only people interacting with the system will be students. Our clients will provide training if necessary for the students in their lab section however training will be minimal because students have restricted access.
· No training will be required for any test tools. Each function of the system will be tested separately as shown in our unit tests. Team leader, Justin Spegele, and testing manager, Kristen Dobreski, will be doing the majority of the testing.
· Justin Spegele – Team Leader & Webmaster – Justin is responsible for the overall strategy for this level of the plan, for setting the risks for the test plan and for making the critical go/no go decisions for items not covered in the test plan.
· Kristen Dobreski – Testing Manager – Kristen is responsible for selecting features to be tested and not tested and for resolving any scheduling conflicts regarding testing, including testing on the production system.
· Matt Warner – Lead Programmer & System Administrator – Matt is responsible for providing any required training needed to use the production system and production environments, although all team members are expected to gain at least a basic understanding of these systems and environments on their own.
· Dan Lomanto - Development Manager – Dan is responsible for ensuring that all required elements are in place for testing.
· NSG Software has utilized a Gantt chart as its organizational method for the project plan. Documents and presentations will continue to be delivered ontime.
· The Waterfall Model is another method we used to schedule our project plan.
· Scheduled Milestones left this semester:
- February 20, 2006- Detailed Design documents due
- February 21, 2006- Detailed Design Presentations
- May 1, 2006- Acceptance Test documents due
- May 2, 2006- Acceptance Test Presentations
o May 5, 2006- Academic Celebration Presentations
4.1.17. Planning Risks and
Contingencies
The following is a list of risks to the project, each followed by a list of possible steps that can be taken to remedy each situation.
· Lack of personnel resources when testing begins
1. The number of tests performed will be reduced.
2. The test team will work overtime
3. The number of acceptable defects will be increased.
4. The scope of the project may change.
· Lack of availability of required hardware, software, data or tools.
1. The team will consult with the Siena College Computer Science Department’s system administrator, Ken Swarner, about the availability of such products.
2. The team will look into obtaining freeware versions of similar products.
3. The project will be changed to suit similar hardware, software, data or tools.
· Delays in training on the application and/or tools.
o Team members will then be required to gain more of a working knowledge of the product on their own.
· Changes to the original requirements or designs.
1. The testing and development schedule will be altered to suit the changes in the requirements.
2. The team will work overtime.
3. The number of tests performed will be reduced.
4. The scope of the project may change.
· Project is not completed by the due date.
o The team will submit the application, working or not, on the required due date. Late delivery is not acceptable for this project.
The following people must allow the project to
proceed and approve that it is complete.
· The Team Leader evaluates each team member, their work, and how it flows with the team. This is done at every level of the software cycle.
· Dr. Lederman also evaluates our work. He makes sure that each step of the software development schedule is complete and finished satisfactory in a timely manner.
· Most importantly, our clients give us approval on the project. After each step of the software process is completed our clients evaluate our documents and attend a presentation on the material covered in the documents.
The audience for this particular software is one that is very knowledgeable about the system and the integration into the environment in which it will be used. Our clients have strong technical skills and can be seen as qualified critics in approving the system.
4.2.1.
Main Pages
Screen: Login Page
Date:
Tester:
Screen: Pass Fail
Field Name: “Username” Text Box
Attempted |
Expected Result |
Pass |
Fail |
Comments |
|
1. Right Click |
Menu pops up |
|
|
|
|
2. Left Click |
Allows user to enter text. |
Field Name: “Password” Text Box
Attempted |
Expected Result |
Pass |
Fail |
Comments |
|
1. Right Click |
Menu pops up |
|
|
|
|
2. Left Click |
Allows user to enter text. |
Field Name: “Submit” Button
Attempted |
Expected Result |
Pass |
Fail |
Comments |
|
1. Right Click |
Menu pops up |
|
|
|
|
2. Left Click |
Calls the “Login” Function; Takes user to their splash page. |
Field Name: “Reset” Button
Attempted |
Expected Result |
Pass |
Fail |
Comments |
|
1. Right Click |
Menu pops up |
|
|
|
|
2. Left Click |
Calls the “Reset” Function (Clears Form). |
Field Name: “Students” Link
Attempted |
Expected Result |
Pass |
Fail |
Comments |
|
1. Right Click |
Menu pops up |
|
|
|
|
2. Left Click |
Takes the user to the “Create New Student Account” page. |
Field Name: “Lecture Instructors” Link
Attempted |
Expected Result |
Pass |
Fail |
Comments |
|
1. Right Click |
Menu pops up |
|
|
|
|
2. Left Click |
Takes the user to the “Create New Lecture Instructor Account” page. |
Field Name: “Lab Instructors” Link
Attempted |
Expected Result |
Pass |
Fail |
Comments |
|
1. Right Click |
Menu pops up |
|
|
|
|
2. Left Click |
Takes the user to the “Create New Lab Instructor Account” page. |
Screen: New Instructor – Create Account
Date:
Tester:
Screen: Pass Fail
Field Name: “Exit” Link
Attempted |
Expected Result |
Pass |
Fail |
Comments |
|
1. Right Click |
Menu pops up |
|
|
|
|
2. Left Click |
Takes the user to an exit page. |
Field Name: “Create new Account” Link
Attempted |
Expected Result |
Pass |
Fail |
Comments |
|
1. Right Click |
Menu pops up |
|
|
|
|
2. Left Click |
Takes the user to the create new account page. |
Field Name: “XLS Password” Text Box
Attempted |
Expected Result |
Pass |
Fail |
Comments |
|
1. Right Click |
Menu pops up |
|
|
|
|
2. Left Click |
Allows user to enter text. |
Field Name: “What’s This?” Link
Attempted |
Expected Result |
Pass |
Fail |
Comments |
|
1. Right Click |
Menu pops up |
|
|
|
|
2. Left Click |
Takes the user to the “XLS Password Explained” page. |
Field Name: “First Name” Text Box
Attempted |
Expected Result |
Pass |
Fail |
Comments |
|
1. Right Click |
Menu pops up |
|
|
|
|
2. Left Click |
Allows user to enter text. |
Field Name: “Last Name” Text Box
Attempted |
Expected Result |
Pass |
Fail |
Comments |
|
1. Right Click |
Menu pops up |
|
|
|
|
2. Left Click |
Allows user to enter text. |
Field Name: “ID” Text Box
Attempted |
Expected Result |
Pass |
Fail |
Comments |
|
1. Right Click |
Menu pops up |
|
|
|
|
2. Left Click |
Allows user to enter text. |
Field Name: “E-Mail” Text Box
Attempted |
Expected Result |
Pass |
Fail |
Comments |
|
1. Right Click |
Menu pops up |
|
|
|
|
2. Left Click |
Allows user to enter text. |
Field Name: “Birthdate” Text Box
Attempted |
Expected Result |
Pass |
Fail |
Comments |
|
1. Right Click |
Menu pops up |
|
|
|
|
2. Left Click |
Allows user to enter text. |
Field Name: “Lecture Section” Drop Down Menu
Attempted |
Expected Result |
Pass |
Fail |
Comments |
|
1. Right Click |
Menu pops up |
|
|
|
|
2. Left Click |
Shows list of available lecture sections. |
Field Name: “Register” Button
Attempted |
Expected Result |
Pass |
Fail |
Comments |
|
1. Right Click |
Menu pops up |
|
|
|
|
2. Left Click |
Calls the “RegisterNewInstructor” Function |
Screen: New Student – Create Account
Date:
Tester:
Screen: Pass Fail
Field Name: “Exit” Link
Attempted |
Expected Result |
Pass |
Fail |
Comments |
|
1. Right Click |
Menu pops up |
|
|
|
|
2. Left Click |
Takes the user to an exit page. |
Field Name: “Create new Account” Link
Attempted |
Expected Result |
Pass |
Fail |
Comments |
|
1. Right Click |
Menu pops up |
|
|
|
|
2. Left Click |
Takes the user to the create new account page. |
Field Name: “XLS Password” Text Box
Attempted |
Expected Result |
Pass |
Fail |
Comments |
|
1. Right Click |
Menu pops up |
|
|
|
|
2. Left Click |
Allows user to enter text. |
Field Name: “What’s This?” Link
Attempted |
Expected Result |
Pass |
Fail |
Comments |
|
1. Right Click |
Menu pops up |
|
|
|
|
2. Left Click |
Takes the user to the “XLS Password Explained” page. |
Field Name: “First Name” Text Box
Attempted |
Expected Result |
Pass |
Fail |
Comments |
|
1. Right Click |
Menu pops up |
|
|
|
|
2. Left Click |
Allows user to enter text. |
Field Name: “Middle Initial” Text Box
Attempted |
Expected Result |
Pass |
Fail |
Comments |
|
1. Right Click |
Menu pops up |
|
|
|
|
2. Left Click |
Allows user to enter text. |
Field Name: “Last Name” Text Box
Attempted |
Expected Result |
Pass |
Fail |
Comments |
|
1. Right Click |
Menu pops up |
|
|
|
|
2. Left Click |
Allows user to enter text. |
Field Name: “SID” Text Box
Attempted |
Expected Result |
Pass |
Fail |
Comments |
|
1. Right Click |
Menu pops up |
|
|
|
|
2. Left Click |
Allows user to enter text. |
Field Name: “E-Mail” Text Box
Attempted |
Expected Result |
Pass |
Fail |
Comments |
|
1. Right Click |
Menu pops up |
|
|
|
|
2. Left Click |
Allows user to enter text. |
Field Name: “Birthdate” Text Box
Attempted |
Expected Result |
Pass |
Fail |
Comments |
|
1. Right Click |
Menu pops up |
|
|
|
|
2. Left Click |
Allows user to enter text. |
Field Name: “Lecture Section” Drop Down Menu
Attempted |
Expected Result |
Pass |
Fail |
Comments |
|
1. Right Click |
Menu pops up |
|
|
|
|
2. Left Click |
Shows list of available lecture sections. |
Field Name: “Lab Section” Drop Down Menu
Attempted |
Expected Result |
Pass |
Fail |
Comments |
|
1. Right Click |
Menu pops up |
|
|
|
|
2. Left Click |
Shows list of available lab sections. |
Field Name: “Register” Button
Attempted |
Expected Result |
Pass |
Fail |
Comments |
|
1. Right Click |
Menu pops up |
|
|
|
|
2. Left Click |
Calls the “RegisterNewStudent” Function |
4.2.2. Course
Coordinator Pages
Screen: Course Coordinator – Splash Page
Date:
Tester:
Screen: Pass Fail
Field Name: “Logout” Link
Attempted |
Expected Result |
Pass |
Fail |
Comments |
|
1. Right Click |
Menu pops up |
|
|
|
|
2. Left Click |
Logs the user out and takes them to the Login screen. |
Field Name: “Change Password” Link
Attempted |
Expected Result |
Pass |
Fail |
Comments |
|
1. Right Click |
Menu pops up |
|
|
|
|
2. Left Click |
Takes the user to the Change Password page. |
Field Name: “Upload Grading Key” Link
Attempted |
Expected Result |
Pass |
Fail |
Comments |
|
1. Right Click |
Menu pops up |
|
|
|
|
2. Left Click |
Takes the user to the upload grading key page. |
Field
Name: “View Grading Summaries” Link
Attempted |
Expected Result |
Pass |
Fail |
Comments |
|
1. Right Click |
Menu pops up |
|
|
|
|
2. Left Click |
Takes the user to the view grading summaries page. |
Field Name: “Create
Student Account” Link
Attempted |
Expected Result |
Pass |
Fail |
Comments |
|
1. Right Click |
Menu pops up |
|
|
|
|
2. Left Click |
Takes the user to the Create Student Account page. |
Field Name: “Edit
Student Account” Link
Attempted |
Expected Result |
Pass |
Fail |
Comments |
|
1. Right Click |
Menu pops up |
|
|
|
|
2. Left Click |
Takes the user to the Edit Student Account Page. |
Field Name: “Create
Instructor Account” Link
Attempted |
Expected Result |
Pass |
Fail |
Comments |
|
1. Right Click |
Menu pops up |
|
|
|
|
2. Left Click |
Takes the user to the Create Instructor Account page. |
Field Name: “Edit
Instructor Account” Link
Attempted |
Expected Result |
Pass |
Fail |
Comments |
|
1. Right Click |
Menu pops up |
|
|
|
|
2. Left Click |
Takes the user to the Edit Instructor Account page. |
Field Name:
“Add/Delete Lecture Section” Link
Attempted |
Expected Result |
Pass |
Fail |
Comments |
|
1. Right Click |
Menu pops up |
|
|
|
|
2. Left Click |
Takes the user to the Add/Delete Lecture Section page. |
Field Name:
“Add/Delete Lab Section” Link
Attempted |
Expected Result |
Pass |
Fail |
Comments |
|
1. Right Click |
Menu pops up |
|
|
|
|
2. Left Click |
Takes the user to the Add/Delete Lab Section page. |
Screen: Course Coordinator – Upload Grading Key
Date:
Tester:
Screen: Pass Fail
Field Name: “Logout” Link
Attempted |
Expected Result |
Pass |
Fail |
Comments |
|
1. Right Click |
Menu pops up |
|
|
|
|
2. Left Click |
Logs the user out and takes them to the Login screen. |
Field Name: “Change Password” Link
Attempted |
Expected Result |
Pass |
Fail |
Comments |
|
1. Right Click |
Menu pops up |
|
|
|
|
2. Left Click |
Takes the user to the Change Password page. |
Field Name: “Upload Grading Key” Link
Attempted |
Expected Result |
Pass |
Fail |
Comments |
|
1. Right Click |
Menu pops up |
|
|
|
|
2. Left Click |
Takes the user to the upload grading key page. |
Field
Name: “View Grading Summaries” Link
Attempted |
Expected Result |
Pass |
Fail |
Comments |
|
1. Right Click |
Menu pops up |
|
|
|
|
2. Left Click |
Takes the user to the view grading summaries page. |
Field Name: “Create
Student Account” Link
Attempted |
Expected Result |
Pass |
Fail |
Comments |
|
1. Right Click |
Menu pops up |
|
|
|
|
2. Left Click |
Takes the user to the Create Student Account page. |
Field Name: “Edit
Student Account” Link
Attempted |
Expected Result |
Pass |
Fail |
Comments |
|
1. Right Click |
Menu pops up |
|
|
|
|
2. Left Click |
Takes the user to the Edit Student Account Page. |
Field Name: “Create
Instructor Account” Link
Attempted |
Expected Result |
Pass |
Fail |
Comments |
|
1. Right Click |
Menu pops up |
|
|
|
|
2. Left Click |
Takes the user to the Create Instructor Account page. |
Field Name: “Edit
Instructor Account” Link
Attempted |
Expected Result |
Pass |
Fail |
Comments |
|
1. Right Click |
Menu pops up |
|
|
|
|
2. Left Click |
Takes the user to the Edit Instructor Account page. |
Field Name:
“Add/Delete Lecture Section” Link
Attempted |
Expected Result |
Pass |
Fail |
Comments |
|
1. Right Click |
Menu pops up |
|
|
|
|
2. Left Click |
Takes the user to the Add/Delete Lecture Section page. |
Field Name:
“Add/Delete Lab Section” Link
Attempted |
Expected Result |
Pass |
Fail |
Comments |
|
1. Right Click |
Menu pops up |
|
|
|
|
2. Left Click |
Takes the user to the Add/Delete Lab Section page. |
Field Name: Lab
Template Text Box
Attempted |
Expected Result |
Pass |
Fail |
Comments |
|
1. Right Click |
Menu pops up |
|
|
|
|
2. Left Click |
Allows the user to input text. |
Field Name: Lab
Template “Browse” Button
Attempted |
Expected Result |
Pass |
Fail |
Comments |
|
1. Right Click |
Menu pops up |
|
|
|
|
2. Left Click |
Takes the user to a browse window to locate the file to be uploaded. |
Field Name: Grading
Guide Text Box
Attempted |
Expected Result |
Pass |
Fail |
Comments |
|
1. Right Click |
Menu pops up |
|
|
|
|
2. Left Click |
Allows the user to input text. |
Field Name: Grading
Guide “Browse” Button
Attempted |
Expected Result |
Pass |
Fail |
Comments |
|
1. Right Click |
Menu pops up |
|
|
|
|
2. Left Click |
Takes the user to a browse window to locate the file to be uploaded. |
Screen: Course Coordinator – Edit Instructor Account
Date:
Tester:
Screen: Pass Fail
Field Name: “Logout” Link
Attempted |
Expected Result |
Pass |
Fail |
Comments |
|
1. Right Click |
Menu pops up |
|
|
|
|
2. Left Click |
Logs the user out and takes them to the Login screen. |
Field Name: “Change Password” Link
Attempted |
Expected Result |
Pass |
Fail |
Comments |
|
1. Right Click |
Menu pops up |
|
|
|
|
2. Left Click |
Takes the user to the Change Password page. |
Field Name: “Upload Grading Key” Link
Attempted |
Expected Result |
Pass |
Fail |
Comments |
|
1. Right Click |
Menu pops up |
|
|
|
|
2. Left Click |
Takes the user to the upload grading key page. |
Field
Name: “View Grading Summaries” Link
Attempted |
Expected Result |
Pass |
Fail |
Comments |
|
1. Right Click |
Menu pops up |
|
|
|
|
2. Left Click |
Takes the user to the view grading summaries page. |
Field Name: “Create
Student Account” Link
Attempted |
Expected Result |
Pass |
Fail |
Comments |
|
1. Right Click |
Menu pops up |
|
|
|
|
2. Left Click |
Takes the user to the Create Student Account page. |
Field Name: “Edit
Student Account” Link
Attempted |
Expected Result |
Pass |
Fail |
Comments |
|
1. Right Click |
Menu pops up |
|
|
|
|
2. Left Click |
Takes the user to the Edit Student Account Page. |
Field Name: “Create
Instructor Account” Link
Attempted |
Expected Result |
Pass |
Fail |
Comments |
|
1. Right Click |
Menu pops up |
|
|
|
|
2. Left Click |
Takes the user to the Create Instructor Account page. |
Field Name: “Edit
Instructor Account” Link
Attempted |
Expected Result |
Pass |
Fail |
Comments |
|
1. Right Click |
Menu pops up |
|
|
|
|
2. Left Click |
Takes the user to the Edit Instructor Account page. |
Field Name:
“Add/Delete Lecture Section” Link
Attempted |
Expected Result |
Pass |
Fail |
Comments |
|
1. Right Click |
Menu pops up |
|
|
|
|
2. Left Click |
Takes the user to the Add/Delete Lecture Section page. |
Field Name:
“Add/Delete Lab Section” Link
Attempted |
Expected Result |
Pass |
Fail |
Comments |
|
1. Right Click |
Menu pops up |
|
|
|
|
2. Left Click |
Takes the user to the Add/Delete Lab Section page. |
Field Name: “First Name” Text Box
Attempted |
Expected Result |
Pass |
Fail |
Comments |
|
1. Right Click |
Menu pops up |
|
|
|
|
2. Left Click |
Allows user to enter text. |
Field Name: “Last Name” Text Box
Attempted |
Expected Result |
Pass |
Fail |
Comments |
|
1. Right Click |
Menu pops up |
|
|
|
|
2. Left Click |
Allows user to enter text. |
Field Name: “SID” Text Box
Attempted |
Expected Result |
Pass |
Fail |
Comments |
|
1. Right Click |
Menu pops up |
|
|
|
|
2. Left Click |
Allows user to enter text. |
Field Name: “E-Mail” Text Box
Attempted |
Expected Result |
Pass |
Fail |
Comments |
|
1. Right Click |
Menu pops up |
|
|
|
|
2. Left Click |
Allows user to enter text. |
Field Name: “Lecture Section” Drop Down Menu
Attempted |
Expected Result |
Pass |
Fail |
Comments |
|
1. Right Click |
Menu pops up |
|
|
|
|
2. Left Click |
Shows list of available lecture sections. |
Field Name: “Lab Section” Drop Down Menu
Attempted |
Expected Result |
Pass |
Fail |
Comments |
|
1. Right Click |
Menu pops up |
|
|
|
|
2. Left Click |
Shows list of available lab sections. |
Field Name: “Save Changes” Button
Attempted |
Expected Result |
Pass |
Fail |
Comments |
|
1. Right Click |
Menu pops up |
|
|
|
|
2. Left Click |
Calls the “EditInstructorAccount” Function |
Screen: Course Coordinator – Add Lab Section
Date:
Tester:
Screen: Pass Fail
Field Name: “Logout” Link
Attempted |
Expected Result |
Pass |
Fail |
Comments |
|
1. Right Click |
Menu pops up |
|
|
|
|
2. Left Click |
Logs the user out and takes them to the Login screen. |
Field Name: “Change Password” Link
Attempted |
Expected Result |
Pass |
Fail |
Comments |
|
1. Right Click |
Menu pops up |
|
|
|
|
2. Left Click |
Takes the user to the Change Password page. |
Field Name: “Upload Grading Key” Link
Attempted |
Expected Result |
Pass |
Fail |
Comments |
|
1. Right Click |
Menu pops up |
|
|
|
|
2. Left Click |
Takes the user to the upload grading key page. |
Field
Name: “View Grading Summaries” Link
Attempted |
Expected Result |
Pass |
Fail |
Comments |
|
1. Right Click |
Menu pops up |
|
|
|
|
2. Left Click |
Takes the user to the view grading summaries page. |
Field Name: “Create
Student Account” Link
Attempted |
Expected Result |
Pass |
Fail |
Comments |
|
1. Right Click |
Menu pops up |
|
|
|
|
2. Left Click |
Takes the user to the Create Student Account page. |
Field Name: “Edit
Student Account” Link
Attempted |
Expected Result |
Pass |
Fail |
Comments |
|
1. Right Click |
Menu pops up |
|
|
|
|
2. Left Click |
Takes the user to the Edit Student Account Page. |
Field Name: “Create
Instructor Account” Link
Attempted |
Expected Result |
Pass |
Fail |
Comments |
|
1. Right Click |
Menu pops up |
|
|
|
|
2. Left Click |
Takes the user to the Create Instructor Account page. |
Field Name: “Edit
Instructor Account” Link
Attempted |
Expected Result |
Pass |
Fail |
Comments |
|
1. Right Click |
Menu pops up |
|
|
|
|
2. Left Click |
Takes the user to the Edit Instructor Account page. |
Field Name:
“Add/Delete Lecture Section” Link
Attempted |
Expected Result |
Pass |
Fail |
Comments |
|
1. Right Click |
Menu pops up |
|
|
|
|
2. Left Click |
Takes the user to the Add/Delete Lecture Section page. |
Field Name:
“Add/Delete Lab Section” Link
Attempted |
Expected Result |
Pass |
Fail |
Comments |
|
1. Right Click |
Menu pops up |
|
|
|
|
2. Left Click |
Takes the user to the Add/Delete Lab Section page. |
Field Name: “Lab Section” Drop Down Menu
Attempted |
Expected Result |
Pass |
Fail |
Comments |
|
1. Right Click |
Menu pops up |
|
|
|
|
2. Left Click |
Shows list of available lab sections. |
Field Name: “Section” Text Box
Attempted |
Expected Result |
Pass |
Fail |
Comments |
|
1. Right Click |
Menu pops up |
|
|
|
|
2. Left Click |
Allows user to enter text. |
Field Name: “Instructor” Drop Down Menu
Attempted |
Expected Result |
Pass |
Fail |
Comments |
|
1. Right Click |
Menu pops up |
|
|
|
|
2. Left Click |
Shows list of available lab Instructors. |
Field Name: “Add Section” Button
Attempted |
Expected Result |
Pass |
Fail |
Comments |
|
1. Right Click |
Menu pops up |
|
|
|
|
2. Left Click |
Calls the “AddLabSection” Function |
Screen: Course Coordinator – Add Lab Section
Date:
Tester:
Screen: Pass Fail
Field Name: “Logout” Link
Attempted |
Expected Result |
Pass |
Fail |
Comments |
|
1. Right Click |
Menu pops up |
|
|
|
|
2. Left Click |
Logs the user out and takes them to the Login screen. |
Field Name: “Change Password” Link
Attempted |
Expected Result |
Pass |
Fail |
Comments |
|
1. Right Click |
Menu pops up |
|
|
|
|
2. Left Click |
Takes the user to the Change Password page. |
Field Name: “Upload Grading Key” Link
Attempted |
Expected Result |
Pass |
Fail |
Comments |
|
1. Right Click |
Menu pops up |
|
|
|
|
2. Left Click |
Takes the user to the upload grading key page. |
Field
Name: “View Grading Summaries” Link
Attempted |
Expected Result |
Pass |
Fail |
Comments |
|
1. Right Click |
Menu pops up |
|
|
|
|
2. Left Click |
Takes the user to the view grading summaries page. |
Field Name: “Create Student
Account” Link
Attempted |
Expected Result |
Pass |
Fail |
Comments |
|
1. Right Click |
Menu pops up |
|
|
|
|
2. Left Click |
Takes the user to the Create Student Account page. |
Field Name: “Edit
Student Account” Link
Attempted |
Expected Result |
Pass |
Fail |
Comments |
|
1. Right Click |
Menu pops up |
|
|
|
|
2. Left Click |
Takes the user to the Edit Student Account Page. |
Field Name: “Create
Instructor Account” Link
Attempted |
Expected Result |
Pass |
Fail |
Comments |
|
1. Right Click |
Menu pops up |
|
|
|
|
2. Left Click |
Takes the user to the Create Instructor Account page. |
Field Name: “Edit
Instructor Account” Link
Attempted |
Expected Result |
Pass |
Fail |
Comments |
|
1. Right Click |
Menu pops up |
|
|
|
|
2. Left Click |
Takes the user to the Edit Instructor Account page. |
Field Name: “Add/Delete
Lecture Section” Link
Attempted |
Expected Result |
Pass |
Fail |
Comments |
|
1. Right Click |
Menu pops up |
|
|
|
|
2. Left Click |
Takes the user to the Add/Delete Lecture Section page. |
Field Name:
“Add/Delete Lab Section” Link
Attempted |
Expected Result |
Pass |
Fail |
Comments |
|
1. Right Click |
Menu pops up |
|
|
|
|
2. Left Click |
Takes the user to the Add/Delete Lab Section page. |
Field Name: “Lecture Section” Drop Down Menu
Attempted |
Expected Result |
Pass |
Fail |
Comments |
|
1. Right Click |
Menu pops up |
|
|
|
|
2. Left Click |
Shows list of available lecture sections. |
Field Name: “Section” Text Box
Attempted |
Expected Result |
Pass |
Fail |
Comments |
|
1. Right Click |
Menu pops up |
|
|
|
|
2. Left Click |
Allows user to enter text. |
Field Name: “Instructor” Drop Down Menu
Attempted |
Expected Result |
Pass |
Fail |
Comments |
|
1. Right Click |
Menu pops up |
|
|
|
|
2. Left Click |
Shows list of available lecture Instructors. |
Field Name: “Add Section” Button
Attempted |
Expected Result |
Pass |
Fail |
Comments |
|
1. Right Click |
Menu pops up |
|
|
|
|
2. Left Click |
Calls the “AddLectureSection” Function |
Screen: Course Coordinator – View Summaries
Date:
Tester:
Screen: Pass Fail
Field Name: “Logout” Link
Attempted |
Expected Result |
Pass |
Fail |
Comments |
|
1. Right Click |
Menu pops up |
|
|
|
|
2. Left Click |
Logs the user out and takes them to the Login screen. |
Field Name: “Change Password” Link
Attempted |
Expected Result |
Pass |
Fail |
Comments |
|
1. Right Click |
Menu pops up |
|
|
|
|
2. Left Click |
Takes the user to the Change Password page. |
Field Name: “Upload Grading Key” Link
Attempted |
Expected Result |
Pass |
Fail |
Comments |
|
1. Right Click |
Menu pops up |
|
|
|
|
2. Left Click |
Takes the user to the upload grading key page. |
Field
Name: “View Grading Summaries” Link
Attempted |
Expected Result |
Pass |
Fail |
Comments |
|
1. Right Click |
Menu pops up |
|
|
|
|
2. Left Click |
Takes the user to the view grading summaries page. |
Field Name: “Create
Student Account” Link
Attempted |
Expected Result |
Pass |
Fail |
Comments |
|
1. Right Click |
Menu pops up |
|
|
|
|
2. Left Click |
Takes the user to the Create Student Account page. |
Field Name: “Edit
Student Account” Link
Attempted |
Expected Result |
Pass |
Fail |
Comments |
|
1. Right Click |
Menu pops up |
|
|
|
|
2. Left Click |
Takes the user to the Edit Student Account Page. |
Field Name: “Create
Instructor Account” Link
Attempted |
Expected Result |
Pass |
Fail |
Comments |
|
1. Right Click |
Menu pops up |
|
|
|
|
2. Left Click |
Takes the user to the Create Instructor Account page. |
Field Name: “Edit
Instructor Account” Link
Attempted |
Expected Result |
Pass |
Fail |
Comments |
|
1. Right Click |
Menu pops up |
|
|
|
|
2. Left Click |
Takes the user to the Edit Instructor Account page. |
Field Name:
“Add/Delete Lecture Section” Link
Attempted |
Expected Result |
Pass |
Fail |
Comments |
|
1. Right Click |
Menu pops up |
|
|
|
|
2. Left Click |
Takes the user to the Add/Delete Lecture Section page. |
Field Name:
“Add/Delete Lab Section” Link
Attempted |
Expected Result |
Pass |
Fail |
Comments |
|
1. Right Click |
Menu pops up |
|
|
|
|
2. Left Click |
Takes the user to the Add/Delete Lab Section page. |
* The main content for this page has not been determined
at this time.
4.2.3. Lab Instructor Pages
Screen: Lab Instructor – Splash Page
Date:
Tester:
Screen: Pass Fail
Field Name: “Logout” Link
Attempted |
Expected Result |
Pass |
Fail |
Comments |
|
1. Right Click |
Menu pops up |
|
|
|
|
2. Left Click |
Logs the user out and takes them to the Login screen. |
Field Name: “Change Password” Link
Attempted |
Expected Result |
Pass |
Fail |
Comments |
|
1. Right Click |
Menu pops up |
|
|
|
|
2. Left Click |
Takes the user to the Change Password page. |
Field Name: “View Grading Summaries” Link
Attempted |
Expected Result |
Pass |
Fail |
Comments |
|
1. Right Click |
Menu pops up |
|
|
|
|
2. Left Click |
Takes the user to the view grading summaries page. |
Field
Name: “View Grades” Link
Attempted |
Expected Result |
Pass |
Fail |
Comments |
|
1. Right Click |
Menu pops up |
|
|
|
|
2. Left Click |
Takes the user to the page grades page. |
Field Name: “Find a
Student” Link
Attempted |
Expected Result |
Pass |
Fail |
Comments |
|
1. Right Click |
Menu pops up |
|
|
|
|
2. Left Click |
Takes the user to the find a student page. |
Screen: Lab Instructor – Find a Student
Date:
Tester:
Screen: Pass Fail
Field Name: “Logout” Link
Attempted |
Expected Result |
Pass |
Fail |
Comments |
|
1. Right Click |
Menu pops up |
|
|
|
|
2. Left Click |
Logs the user out and takes them to the Login screen. |
Field Name: “Change Password” Link
Attempted |
Expected Result |
Pass |
Fail |
Comments |
|
1. Right Click |
Menu pops up |
|
|
|
|
2. Left Click |
Takes the user to the Change Password page. |
Field Name: “View Grading Summaries” Link
Attempted |
Expected Result |
Pass |
Fail |
Comments |
|
1. Right Click |
Menu pops up |
|
|
|
|
2. Left Click |
Takes the user to the view grading summaries page. |
Field
Name: “Grades” Link
Attempted |
Expected Result |
Pass |
Fail |
Comments |
|
1. Right Click |
Menu pops up |
|
|
|
|
2. Left Click |
Takes the user to the page grades page. |
Field Name: “Find a
Student” Link
Attempted |
Expected Result |
Pass |
Fail |
Comments |
|
1. Right Click |
Menu pops up |
|
|
|
|
2. Left Click |
Takes the user to the find a student page. |
Field Name: “Search By Last Name” Text Box
Attempted |
Expected Result |
Pass |
Fail |
Comments |
|
1. Right Click |
Menu pops up |
|
|
|
|
2. Left Click |
Allows user to enter text. |
Field Name: “Search By User Name” Text Box
Attempted |
Expected Result |
Pass |
Fail |
Comments |
|
1. Right Click |
Menu pops up |
|
|
|
|
2. Left Click |
Allows user to enter text. |
Field Name: “Search” Button
Attempted |
Expected Result |
Pass |
Fail |
Comments |
|
1. Right Click |
Menu pops up |
|
|
|
|
2. Left Click |
Calls the “SearchStudent” Function |
Screen: Lab Instructor – View Grades
Date:
Tester:
Screen: Pass Fail
Field Name: “Logout” Link
Attempted |
Expected Result |
Pass |
Fail |
Comments |
|
1. Right Click |
Menu pops up |
|
|
|
|
2. Left Click |
Logs the user out and takes them to the Login screen. |
Field Name: “Change Password” Link
Attempted |
Expected Result |
Pass |
Fail |
Comments |
|
1. Right Click |
Menu pops up |
|
|
|
|
2. Left Click |
Takes the user to the Change Password page. |
Field Name: “View Grading Summaries” Link
Attempted |
Expected Result |
Pass |
Fail |
Comments |
|
1. Right Click |
Menu pops up |
|
|
|
|
2. Left Click |
Takes the user to the view grading summaries page. |
Field
Name: “View Grades” Link
Attempted |
Expected Result |
Pass |
Fail |
Comments |
|
1. Right Click |
Menu pops up |
|
|
|
|
2. Left Click |
Takes the user to the page grades page. |
Field Name: “Find a
Student” Link
Attempted |
Expected Result |
Pass |
Fail |
Comments |
|
1. Right Click |
Menu pops up |
|
|
|
|
2. Left Click |
Takes the user to the find a student page. |
Field Name: Various Grade Links
Attempted |
Expected Result |
Pass |
Fail |
Comments |
|
1. Right Click |
Menu pops up |
|
|
|
|
2. Left Click |
Takes the user to a detailed page for that lab grade. |
Screen: Lab Instructor – Grade Files
Date:
Tester:
Screen: Pass Fail
Field Name: “Logout” Link
Attempted |
Expected Result |
Pass |
Fail |
Comments |
|
1. Right Click |
Menu pops up |
|
|
|
|
2. Left Click |
Logs the user out and takes them to the Login screen. |
Field Name: “Change Password” Link
Attempted |
Expected Result |
Pass |
Fail |
Comments |
|
1. Right Click |
Menu pops up |
|
|
|
|
2. Left Click |
Takes the user to the Change Password page. |
Field Name: “Grade Labs” Link
Attempted |
Expected Result |
Pass |
Fail |
Comments |
|
1. Right Click |
Menu pops up |
|
|
|
|
2. Left Click |
Takes the user to the grade labs page. |
Field
Name: “View Grading Summaries” Link
Attempted |
Expected Result |
Pass |
Fail |
Comments |
|
1. Right Click |
Menu pops up |
|
|
|
|
2. Left Click |
Takes the user to the view grading summaries page. |
Field
Name: “Find a Student” Link
Attempted |
Expected Result |
Pass |
Fail |
Comments |
|
1. Right Click |
Menu pops up |
|
|
|
|
2. Left Click |
Takes the user to the view student page. |
Field
Name: “View Submitted Labs” Button
Attempted |
Expected Result |
Pass |
Fail |
Comments |
|
1. Right Click |
Menu pops up |
|
|
|
|
2. Left Click |
Calls the “ViewSubmittedLabs” Function |
Screen: Lab Instructor – View Student Info
Date:
Tester:
Screen: Pass Fail
Field Name: “Logout” Link
Attempted |
Expected Result |
Pass |
Fail |
Comments |
|
1. Right Click |
Menu pops up |
|
|
|
|
2. Left Click |
Logs the user out and takes them to the Login screen. |
Field Name: “Change Password” Link
Attempted |
Expected Result |
Pass |
Fail |
Comments |
|
1. Right Click |
Menu pops up |
|
|
|
|
2. Left Click |
Takes the user to the Change Password page. |
Field Name: “View Grading Summaries” Link
Attempted |
Expected Result |
Pass |
Fail |
Comments |
|
1. Right Click |
Menu pops up |
|
|
|
|
2. Left Click |
Takes the user to the view grading summaries page. |
Field
Name: “View Grades” Link
Attempted |
Expected Result |
Pass |
Fail |
Comments |
|
1. Right Click |
Menu pops up |
|
|
|
|
2. Left Click |
Takes the user to the page grades page. |
Field Name: “Find a
Student” Link
Attempted |
Expected Result |
Pass |
Fail |
Comments |
|
1. Right Click |
Menu pops up |
|
|
|
|
2. Left Click |
Takes the user to the find a student page. |
Field Name: Various Grade Links
Attempted |
Expected Result |
Pass |
Fail |
Comments |
|
1. Right Click |
Menu pops up |
|
|
|
|
2. Left Click |
Takes the user to a detailed page for that lab grade. |
Screen: Lab Instructor – View Grading Summaries
Date:
Tester:
Screen: Pass Fail
Field Name: “Logout” Link
Attempted |
Expected Result |
Pass |
Fail |
Comments |
|
1. Right Click |
Menu pops up |
|
|
|
|
2. Left Click |
Logs the user out and takes them to the Login screen. |
Field Name: “Change Password” Link
Attempted |
Expected Result |
Pass |
Fail |
Comments |
|
1. Right Click |
Menu pops up |
|
|
|
|
2. Left Click |
Takes the user to the Change Password page. |
Field Name: “View Grading Summaries” Link
Attempted |
Expected Result |
Pass |
Fail |
Comments |
|
1. Right Click |
Menu pops up |
|
|
|
|
2. Left Click |
Takes the user to the view grading summaries page. |
Field
Name: “Grades” Link
Attempted |
Expected Result |
Pass |
Fail |
Comments |
|
1. Right Click |
Menu pops up |
|
|
|
|
2. Left Click |
Takes the user to the page grades page. |
Field Name: “Find a
Student” Link
Attempted |
Expected Result |
Pass |
Fail |
Comments |
|
1. Right Click |
Menu pops up |
|
|
|
|
2. Left Click |
Takes the user to the find a student page. |
* The main content for this page has not been determined
at this time.
4.2.4. Student Pages
Screen: Student- Choose Lab
Date:
Tester:
Screen: Pass Fail
Field Name: “Logout” Link
Attempted |
Expected Result |
Pass |
Fail |
Comments |
|
1. Right Click |
Menu pops up |
|
|
|
|
2. Left Click |
Logs the user out and takes them to the Login screen. |
Field Name: “Change Password” Link
Attempted |
Expected Result |
Pass |
Fail |
Comments |
|
1. Right Click |
Menu pops up |
|
|
|
|
2. Left Click |
Takes the user to the Change Password page. |
Field
Name: “Upload Lab” Link
Attempted |
Expected Result |
Pass |
Fail |
Comments |
|
1. Right Click |
Menu pops up |
|
|
|
|
2. Left Click |
Takes the user to the upload lab page. |
Field Name: “View
Grades” Link
Attempted |
Expected Result |
Pass |
Fail |
Comments |
|
1. Right Click |
Menu pops up |
|
|
|
|
2. Left Click |
Takes the user to the view grades page. |
Field Name: “Submit” Button
Attempted |
Expected Result |
Pass |
Fail |
Comments |
|
1. Right Click |
Menu pops up |
|
|
|
|
2. Left Click |
Calls the “ViewLabInfo” Function. |
Screen: Student- Upload Lab
Date:
Tester:
Screen: Pass Fail
Field Name: “Logout” Link
Attempted |
Expected Result |
Pass |
Fail |
Comments |
|
1. Right Click |
Menu pops up |
|
|
|
|
2. Left Click |
Logs the user out and takes them to the Login screen. |
Field Name: “Change Password” Link
Attempted |
Expected Result |
Pass |
Fail |
Comments |
|
1. Right Click |
Menu pops up |
|
|
|
|
2. Left Click |
Takes the user to the Change Password page. |
Field
Name: “Upload Lab” Link
Attempted |
Expected Result |
Pass |
Fail |
Comments |
|
1. Right Click |
Menu pops up |
|
|
|
|
2. Left Click |
Takes the user to the upload lab page. |
Field Name: “View
Grades” Link
Attempted |
Expected Result |
Pass |
Fail |
Comments |
|
1. Right Click |
Menu pops up |
|
|
|
|
2. Left Click |
Takes the user to the view grades page. |
Field Name: “Browse”
Buttons
Attempted |
Expected Result |
Pass |
Fail |
Comments |
|
1. Right Click |
Menu pops up |
|
|
|
|
2. Left Click |
Calls a PHP function to browse files on user’s pc. |
Field Name: “Upload”
Button
Attempted |
Expected Result |
Pass |
Fail |
Comments |
|
1. Right Click |
Menu pops up |
|
|
|
|
2. Left Click |
Calls “UploadFiles” Function. |
Screen: Student- View Grades
Date:
Tester:
Screen: Pass Fail
Field Name: “Logout” Link
Attempted |
Expected Result |
Pass |
Fail |
Comments |
|
1. Right Click |
Menu pops up |
|
|
|
|
2. Left Click |
Logs the user out and takes them to the Login screen. |
Field Name: “Change Password” Link
Attempted |
Expected Result |
Pass |
Fail |
Comments |
|
1. Right Click |
Menu pops up |
|
|
|
|
2. Left Click |
Takes the user to the Change Password page. |
Field
Name: “Upload Lab” Link
Attempted |
Expected Result |
Pass |
Fail |
Comments |
|
1. Right Click |
Menu pops up |
|
|
|
|
2. Left Click |
Takes the user to the upload lab page. |
Field Name: “View
Grades” Link
Attempted |
Expected Result |
Pass |
Fail |
Comments |
|
1. Right Click |
Menu pops up |
|
|
|
|
2. Left Click |
Takes the user to the view grades page. |
Field Name: Various Grade Links
Attempted |
Expected Result |
Pass |
Fail |
Comments |
|
1. Right Click |
Menu pops up |
|
|
|
|
2. Left Click |
Takes the user to a detailed page for that lab grade. |
Screen: Student- Change Password
Date:
Tester:
Screen: Pass Fail
Field Name: “Logout” Link
Attempted |
Expected Result |
Pass |
Fail |
Comments |
|
1. Right Click |
Menu pops up |
|
|
|
|
2. Left Click |
Logs the user out and takes them to the Login screen. |
Field Name: “Change Password” Link
Attempted |
Expected Result |
Pass |
Fail |
Comments |
|
1. Right Click |
Menu pops up |
|
|
|
|
2. Left Click |
Takes the user to the Change Password page. |
Field
Name: “Upload Lab” Link
Attempted |
Expected Result |
Pass |
Fail |
Comments |
|
1. Right Click |
Menu pops up |
|
|
|
|
2. Left Click |
Takes the user to the upload lab page. |
Field Name: “View
Grades” Link
Attempted |
Expected Result |
Pass |
Fail |
Comments |
|
1. Right Click |
Menu pops up |
|
|
|
|
2. Left Click |
Takes the user to the view grades page. |
Field Name: “Change Password” Button
Attempted |
Expected Result |
Pass |
Fail |
Comments |
|
1. Right Click |
Menu pops up |
|
|
|
|
2. Left Click |
Calls the “ChangePassword” Function. |
Field Name: “Old Password” Text Box
Attempted |
Expected Result |
Pass |
Fail |
Comments |
|
1. Right Click |
Menu pops up |
|
|
|
|
2. Left Click |
Allows user to enter text. |
Field Name: “New Password” Text Box
Attempted |
Expected Result |
Pass |
Fail |
Comments |
|
1. Right Click |
Menu pops up |
|
|
|
|
2. Left Click |
Allows user to enter text. |
Field Name: “Confirm” Text Box
Attempted |
Expected Result |
Pass |
Fail |
Comments |
|
1. Right Click |
Menu pops up |
|
|
|
|
2. Left Click |
Allows user to enter text. |
4.2.5. Functions
Class: Parser
Date:
Tester:
Screen: Pass Fail
Function: Bool Bold()
Attempted |
Expected Result |
Pass |
Fail |
Comments |
|
Function Call |
Returns TRUE if the specified cell or field is set to bold, FALSE if not. |
|
|
|
Function: Bool Italics()
Attempted |
Expected Result |
Pass |
Fail |
Comments |
|
Function Call |
Returns TRUE if the specified cell or field is set to italics, FALSE if not. |
|
|
|
Function: Bool Underlined()
Attempted |
Expected Result |
Pass |
Fail |
Comments |
|
Function Call |
Returns TRUE if the specified cell or field is set to underlined, FALSE if not. |
|
|
|
Function: Bool Formula()
Attempted |
Expected Result |
Pass |
Fail |
Comments |
|
Function Call |
Returns TRUE if the specified cell contains a formula, FALSE if not. |
|
|
|
Function: String Formula_Contents()
Attempted |
Expected Result |
Pass |
Fail |
Comments |
|
Function Call |
Returns the formula contained within a cell. |
|
|
|
Function: Int Formula_Result()
Attempted |
Expected Result |
Pass |
Fail |
Comments |
|
Function Call |
Returns the result of a formula. |
|
|
|
Function: String Sheet_Name()
Attempted |
Expected Result |
Pass |
Fail |
Comments |
|
Function Call |
Returns the name of the selected sheet. |
|
|
|
Function: String Field_Name()
Attempted |
Expected Result |
Pass |
Fail |
Comments |
|
Function Call |
Returns the name of the specified field. |
|
|
|
Function: String Font()
Attempted |
Expected Result |
Pass |
Fail |
Comments |
|
Function Call |
Returns the name of the font style of a specified cell or field. |
|
|
|
Function: String Color()
Attempted |
Expected Result |
Pass |
Fail |
Comments |
|
Function Call |
Returns the color of the font of a specified cell or field. |
|
|
|
Function: String Page_Orientation()
Attempted |
Expected Result |
Pass |
Fail |
Comments |
|
Function Call |
Returns the orientation (portrait or landscape) of a specified sheet. |
|
|
|
Function: String Alignment()
Attempted |
Expected Result |
Pass |
Fail |
Comments |
|
Function Call |
Returns the horizontal alignment of the data within a cell. |
|
|
|
Function: String Vertical_Alignment()
Attempted |
Expected Result |
Pass |
Fail |
Comments |
|
Function Call |
Returns the vertical alignment of the data within a cell. |
|
|
|
Function: String Header()
Attempted |
Expected Result |
Pass |
Fail |
Comments |
|
Function Call |
Returns the contents of the header of a specified sheet. |
|
|
|
Function: String Footer()
Attempted |
Expected Result |
Pass |
Fail |
Comments |
|
Function Call |
Returns the contents of the footer of a specified sheet. |
|
|
|
Function: Bool Date()
Attempted |
Expected Result |
Pass |
Fail |
Comments |
|
Function Call |
Returns TRUE if a specified cell contains a date, FALSE if not. |
|
|
|
Function: String Date_Format()
Attempted |
Expected Result |
Pass |
Fail |
Comments |
|
Function Call |
Returns the |
|
|
|
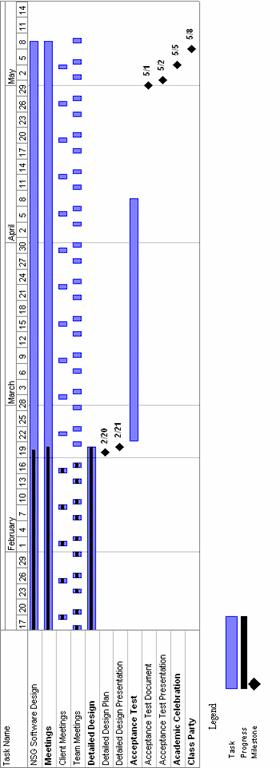
Apache Web Server – an open source web server for Unix-like systems.
Code – A
set of data or symbols that represent a string of instructions to the computer.
Course Coordinator – The
administrator for the Excel Grading System.
Has the privileges to perform all tasks on the web interface as well as
view all information.
CSIS-010 – Intro to Computer Applications. One of the
CSIS-011 – Problem Solving with
Spreadsheets. Another course that will
be using our Excel Grading System.
Data Flow Diagram - A
representation of the functional decomposition of a system.
administrator
will be using on the website to wither grade or submit the labs.
Database - The
organization of all the labs into a structure that is simplest to the faculty
members and System Administrator.
Gantt Chart - A
chart that depicts progress in relation to time, often used in planning and
tracking a project.
GUI – A Graphical User Interface is a method of interacting with a computer
through direct manipulation of graphical images in addition to text.
HTML – In computing, 'HyperText Markup
Language ' (HTML) is a markup language designed for the creation of web pages
with hypertext and other information to be displayed in a web browser.
HTTP - HyperText Transfer Protocol (HTTP) is
the method used to transfer or convey information on the World Wide Web. The
original purpose was to provide a way to publish and receive HTML pages.
HTTPS – The https: URI scheme is a URI scheme
which is equivalent and syntactically identical to the http: scheme normally
used for accessing resources using HTTP. Using an https: URL indicates that
HTTP is to be used, but with additional security measures applied to the
transactions.
Interface – See GUI
Key – The key is something that the
course coordinator uploads into the system in order for the labs submitted by
the students to be corrected against.
The key is a perfect copy of what the lab should look like.
Lab Instructor – The
lab instructor may or may not be a lecture instructor. The lab instructor is a person who grades the
lab reports.
Lab Reports -
A summary of each lab that has been graded for each student who has submitted a
lab.
Lecture Instructor – The
lecture instructor is a person who teaches a lecture section for either
CSIS-010 or CSIS-011. They have the
ability to view grades through the web interface and also grade summaries.
Master Test Plan – The highest level of test plans for software testing.
NSG – Non-Commissioned Software Group.
Parser – The class of functions that will parse information out of Excel files.
PHP –
PHP Hypertext Preprocessor is an
open-source, reflective programming language used mainly for developing
server-side applications, dynamic web content, and more recently, a broader
range of software applications.
Regression Testing - The retesting of a section of code after it has been changed to fix a problem or bug.
Simulators
- A computer program that
attempts to simulate an abstract model of
a particular system.
Student – The student, one of the four main
users within the system, is a person enrolled in either CSIS-010 or
CSIS-011. They have the ability to
submit lab reports and view their own grades.
Test Plan Case – see Unit Test.
Test Plan Documents – Section 4.1 of this document.
UI (User Interface) – See
GUI.
Unit Test - a procedure used to verify that a particular module of source code is
working properly.
Use-Case – Describes how the system responds to
the requests of different actors.
Waterfall Model – A model in which all relevant milestones are identified with their relationship to the development process. It demonstrates what the steps of software development are and in what order they must be completed before the next one is able to begin.