As the internet continues to grow and reach out to more people, web designers have become essential in the task of reaching multiple users at one time. Companies, schools and other organizations have continuously increased expectations, and the average web user has begun to expect more. With so many websites in existence, it is hard to obtain and maintain a user's attention. Studies have shown that a person is more likely to view and remember a website if that website seems more personal to them. The two major factors that make a website feel personal to a user is the presence of photographs and personal information. It is these facts that many of today's most popular websites (specifically Facebook and MySpace) have been built upon.
Using these facts, Initrode
Solutions has utilized important aspects of user interface design to create a
personal Alumni Spotlight Web System. Dr. Eric Breimer and the Computer Science
Department have asked our team to create this system and integrate it into the
redesign of the
The objective of this project is to
create a webpage similar to that of www.Facebook.com, in the sense that a user
will be able to register via a valid email address, and create their personal
profile. The main goal is to create a
strong Siena community that consists of alumni profiles which will show prospective
students, parents, and other alumni what they have accomplished with a their
degree. The profiles and alumni photos will act to create a personal feeling
about
The following requirements inventory was created and modified during previous steps in the software development lifecycle. The purpose of creating this requirements inventory was to reach a formal and complete listing of all features that were to be included in the Alumni Spotlight Web System. Each of these items has been tested fully and the results of these tests can be found in the Test Plan Results document which has been attached separately.
The Alumni Spotlight Web System includes three different user cases, each of
which are described below including itemized lists of specific needs for each.
· This user will be the first user in the database, and the first one created on the CMS.
· The user name will be “Administrator” and a password that we have yet to
determine.
· This user will have complete access to all accounts.
o The administrator will be able to see all registered accounts.
o The administrator should be able to delete a user from the community.
o The administrator should be able to edit a user’s account in the community.
· The administrator will be able to modify the website as well as the
database behind it.
o The administrator will have access to the MySQL database table to edit it.
o The administrator will be able to change the table settings in the
database.
o The administrator will be able to change the style sheets for the website.
o The administrator will have the ability to change functions for the website.
· The administrator will be able to select specific community members to
be spotlighted on the Siena College Computer Science Home Page.
· The administrator will be able to delete the Spotlight Page.
· The administrator will not have a profile homepage like other users rather the administrator will have a control panel.
· The administrator will not be able to change the user name of “Administrator”
· All community users will self register with the community.
· The user will use his/her E-mail address as their User name (Log In).
· The user's password will consist of 6-12 characters, and must contain at least one number.
· If the user forgets their password, the user can retrieve it automatically via
a link labeled “Forgotten Password” which will e-mail the user their current password.
· Each user will have their own account profile which will be customizable
with personal information.
o The following is a list of what will be included in a User’s profile:
§ First Name – User’s first name.
§ Last Name – User’s last name.
§ City - Current city the user lives in.
§ State – Current state the user lives in.
§ E-mail – Current E-mail address the user is using.
§
Graduation Year – What year the user graduated
§ Major – What the user’s major was.
§ Minor(s) – Any minor(s) the user had, if applicable.
§
Degree Earned – The degree earned by the user
while at
§
Favorite Class – The user’s favorite class at
§
Favorite Professor – The user’s favorite professor
at
§ Least Favorite Class – The user’s least favorite class at
§
§ What School if applicable – The name of the school where the graduate degree was/is being earned if the previous field was yes.
§ Current Job Location – The company that the user works for.
§ Current Job Title – The user’s current job title.
§ Salary – The user’s current salary at their current job.
§ Description on Siena Experience – A small description of
what the user
felt about their time spent at
§ Personal Information – Any other personal information the
user might want to share such as family status.
§ Favorite Quote – A quote the user might have found
inspiring in their life or simply a quote that they enjoy.
· The community user will be able to upload their photograph.
o The community user will be able to upload other photos and create photo albums.
o The community user will be able to create, update, delete and add new photo albums.
o The community user will be able to update, delete, and add to old albums as well.
· The community user will have their own photo Album that can be updated.
· The community user will be able to search for other community users that have registered for the Alumni Spotlight Web System.
· This user does not need to register for the community.
· Due to the fact that this type of user is not registered, there is no account associated with these users within the community.
· This user represents any user that visits the Siena College Computer Science Home page.
· This user will only be able to view the current Alumni Spotlight that is active on the Siena College Computer Science Homepage.
Functional Requirements Inventory
·
The Alumni Spotlight Web System must be web
based, so anyone can
access it from
anywhere.
·
The system must work with all major browsers,
including but not limited
to:
o
Internet Explorer 6.0 and 7.0
o
Mozilla Firefox 1.5.07
o
Netscape 7.1
o
Safari 2.0.4
·
The system should be controlled by some sort of
CMS to facilitate the
administrator’s
job.
· The system will allow an administrator to access, monitor, and maintain the web site.
o The administrator will have the ability to review, accept, and deny initial profiles and changes made to those profiles later on.
o The administrator will have the ability to select and use a profile for the Alumni Spotlight.
· The system will allow the administrator to access the database to maintain the user’s data, and make sure the system runs correctly.
·
The administrator must be able to select
specific community user(s) for
the Alumni
Spotlight.
· The system will allow the administrator to generate a page automatically for the Siena College Computer Science Home Page displaying the Alumni Spotlight.
·
In accordance to the point above, this selection
must generate the page to
be loaded on the
Siena College Computer Science Home Page.
· The system should allow for secure sign in to the system via a sign on screen.
· According to the Use Case scenarios, we will ensure that each user type is
correctly established.
· Allow self-registration into the system.
· Allow users to change/add new personal information to their profile in the
following areas:
o First Name
o Last Name
o City
o State
o E-mail
o Graduation Year
o Major
o Minor(s)
o Degree Earned
o Favorite Class
o Favorite Professor
o Least Favorite Class
o
o What School if applicable
o Current Job Location
o Current Job Title
o Salary
o
Description on
o Personal Information
o Favorite Quote
·
The user may will also be able to make changes
to their password, contact information
and their picture.
·
Finally, all page links will be tested and
ensure that they redirect users to
their appropriate link.
Please note that the following requirements are based off of specific screens. For practical purposes, these were placed in the order in which they would be encountered by a community rather than in alphabetical order. Please note that requirements for every screen are not included here, but a complete list of requirements for each screen is included within the Test Plan Results document in the Unit Test secion.
Welcome
Screen
· Upon pressing the “Log On” button we will ensure that the user name and
password are correct, and then redirect the user to their home page.
· We will ensure that the link for registration brings the user to the
“Registration Screen.”
· Lastly, we will ensure that the link for a forgotten password functions
correctly as well, placing the user at the “Forgotten Password Screen.”
· We will make sure that all indicated fields are filled in, and check the
fields to ensure they can handle specific characters, such as spaces or
single quotes.
· We will also make sure that upon submission, the account will be
activated, and a confirmation email will be sent telling the user that their
registration was a success. If the account exists already, we will re-direct
the user to a page informing them that there is already an account registered under that email address.
· We will make sure the email account entered is contained in our database,
and if it is, send the user their password.
· We will make sure the correct information loads with the specified profile.
· A check of all the links will be done, ensuring that they all lead to their
correct, respective pages.
· This page will be checked to make sure all required fields have been filled in above all else.
· We will ensure specific characters such as spaces and single quotes are acceptable.
· Upon submission, we will make sure that each field is saved in the
database, actually updating the specified profile.
· Upon pressing “Search” we will make sure the fields entered check the
database, and return the user to the results screen, showing correct
information according to the search criteria.
· We will ensure that the profiles displayed here are correct in accordance
with the search criteria.
Contact
Us Screen
· We will ensure this screen will send an email to the systems administrator
correctly including the user who sent it, as well as the comments that the
user filled out within the comments area.
Admin Control Panel
· Due to the complexity of the control panel itself, we will summarize the
basic operations that are held within the system. Since our open source
CMS will create the basic functionality of the Admin Control Panel the
basic things to check will be as follows
o That each link on the page works.
o Any change made by the administrator is reflected on the
site, or data base depending upon which has been modified.
o That the administrator will be able to select a community
user as a spotlighted
member, creating a page for the
Computer Science homepage.
Non-Functional Requirements Inventory
Please note that further clarification on these requirements including the pass/fail criteria has been included in section 1.7 of the Test Results document.
·
The Alumni Spotlight Web System should be
o
Universal
o
Efficient
o
Secure
o
Customizable to users
III. Environments, Systems and Performance
The Alumni Spotlight Web System has
been developed at
During the software engineering process, Initrode Solutions has been using a Dell computer, which runs a Windows XP Operating System with Service Pack 2. Initrode has also used an I-Mac, which uses a Macintosh Operating System X10.4.7.
The interface will be developed using a CMS (Content Management System) called Drupal. This system will be accessible anywhere with internet access on all major browsers including Internet Explorer 6.0, Netscape Navigator 7.1, Mozilla Firefox 1.5.07 and Safari 2.0.4.
The Alumni Spotlight Web System
will be developed to run on the three major operating systems: Windows,
Macintosh, and Linux. The web administrator at
Due to the fact that the Alumni Spotlight Web System was created using an external CMS, many of the features, and functionality of this system were not fully known or understood until the Initrode team began development and programming.
With this fact in mind, please note that certain functional requirements and unit test cases were unable to be met due to limitations of the equipment being used in conjunction with the CMS and the time provided for development.
The features that were unable to be completed due to these constraints included the photo album and photo gallery functionality, the sending of automatic e-mail messages to users and administrators and the testing of the system on a Linux machine.
Please refer to Appendix A of the Test Results document for more in-depth explanations and descriptions for these incomplete features.
IV. Test Results
Please note that the test results have been included as a separate document. This document can be found on the web at the following address:
http://oraserv.cs.siena.edu/~perm_initrode/documents/project/TestResultsInitrodeSolutions.html
Administrator Home Page Screen

The administrative user can locate this screen after he/she has successfully logged into the Alumni Spotlight Web System. This page simply notifies the administrator that they have successfully logged into the system.
Administrator Access Control Screen

This screen can be located from the Administrative Control Panel screen by clicking on the "Access Control" option located as a sub category of "administer" on the left hand menu bar. This screen breaks down every aspect of the site and gives the administrator the option to allow or disallows each option for each user type. For example, community users can create profiles and web blogs but the “anyone” user cannot.

This screen can be located from the Administrative Control Panel screen by clicking on the "Content" option located as a sub category of "administer" on the left hand menu bar. From this location, the administrator can edit different types of content that will be available such as photo albums, blogs and forms.
Administrator Main Menu Screen
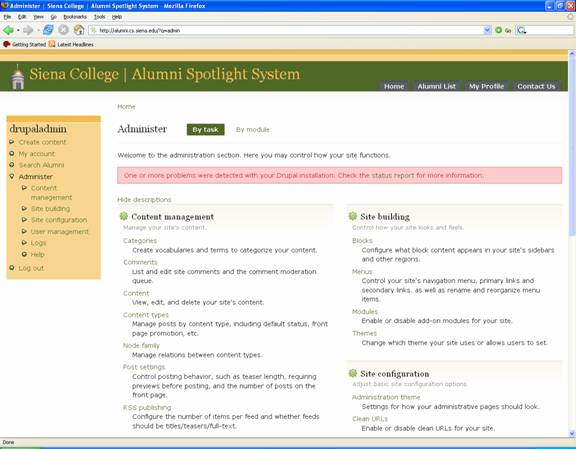
This is the main screen where the administrative user will be able to make changes to different modules, themes, roles and other issues concerned with the site. From here, the administrative user will be able to make all site changes and manage the users as well.

This screen can be located from the Administrative Control Panel screen by clicking on the "Menus" option located as a sub category of "administer" on the left hand menu bar. This screen allows the administrator to enable or disable certain accessories that are associated with the website. These accessories can be disabled completely or selectively. If a feature is disabled completely, no user can use that feature. If the feature is disabled selectively, a particular user's blog entry may be removed or that user's individual ability to use the blog feature can be removed.

In this segment of the administrative control panel, the admin can add, edit and delete links to certain menus, add new menus, or move/edit/delete current menus based upon the designated blocks, or created boxes. To get to this area, the admin will click to “administer” then “site building” then “menus.”
Administrator Recent Events Screen

This screen can be accessed by clicking on the
"Administer" option on the left hand menu bar. This screen is another version of the
Administrator - Logs screen. This screen
allows the administrator to view the most recent occurrences of the
system. This screen differs only
slightly from the Logs screen in that is holds events for a shorter amount of
time and it only displays the most recent events.
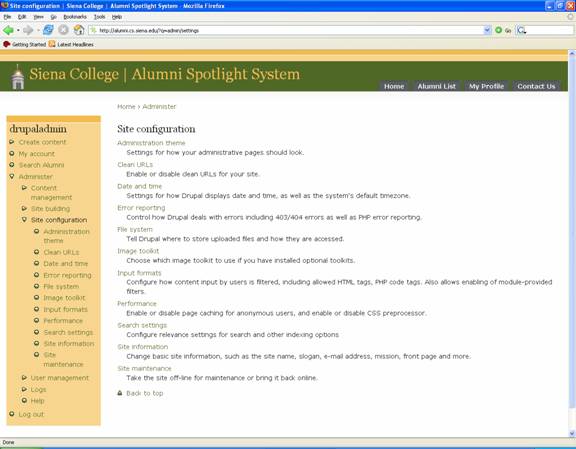
This screen can be located from the Administrative Control Panel screen by clicking on the "Settings" option located as a sub category of "administer" on the left hand menu bar. This screen allows the administrator to set general configuration settings for the site. Specifically the administrator can change general settings, error handling settings, file system settings, and can perform site maintenance and string handling. General settings include basic fields and options for the website and database. Error handling takes care of different errors that may arise during the use of the website. This will allow the administrator to access and change portions of the code if necessary. File system settings are simply in regards to the uploading of user photos. Site maintenance includes the theme and appearance of the site as a whole and string handling deals with checking to ensure that input that goes into the database is acceptable.

This screen can be located from the Administrative Control Panel screen by clicking on the "Modules" option located as a sub category of "administer" on the left hand menu bar. Modules are plug-ins for Drupal that extends its core functionality. This screen contains a list of all available modules as well as descriptions of each. From this screen, the administrator can chose which modules are enabled. Once a module is enabled, new permissions might be made available. Modules can be automatically temporarily disabled to reduce server load when the site becomes extremely busy. This can be done by checking the "throttle" check box instead of the "Enabled" check box.

This screen can be located from the Administrative Control Panel screen by clicking on the "Users" option located as a sub category of "administer" on the left hand menu. This screen gives the administrator a list of all users that are registered within the system including how long they have been members, and the date and time of their last visit. Clicking on the "edit" option to the right of each statement will allow the administrator to edit the content of that user’s profile.

This screen is viewable to all registered users. To get to this screen, the user can click on “Alumni List.” This will return a list of all the alumni that have registered with the system, including their profile picture, and some information from their profile for easy viewing/browsing of the alumni in our system.

This screen will be accessed when the user clicks the Contact Us link. This page allows the user to click a link to send an e-mail to the administrator using their default mailing program to contact the administrator. The page also provides the administrators e-mail address if they would like to use a different program to e-mail the administrator.

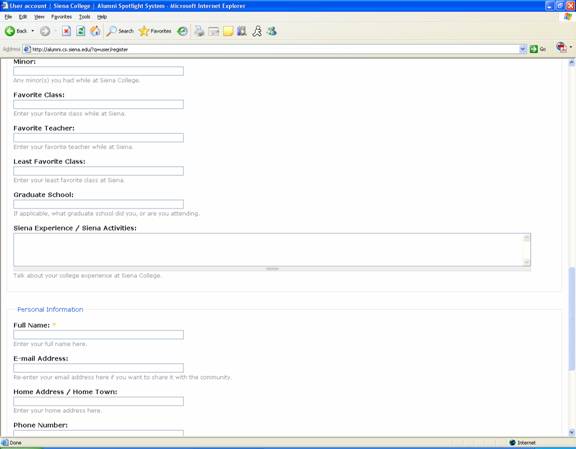
The purpose of this page is to allow the user to change any information in their profile. This page will be accessed from the user’s Home/My Account screen. This screen contains information about the user, only some of which is required. The required fields are labeled with an asterisk. Upon submission, if no errors are found, the user will be redirected to their Home/My Account screen where the changes to their profile will be updated. If errors are found, the screen will be reloaded with a reason for the error.

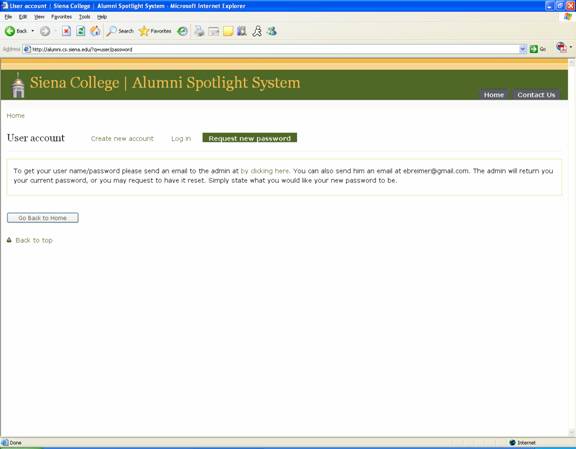
The purpose of this screen is to give the user the ability to recover a lost or forgotten password. The page contains a link that will open the users default mailing program to allow the user to e-mail the administrator directly. The page also displays the administrators e-mail address if they would like to user a different program to e-mail the administrator.
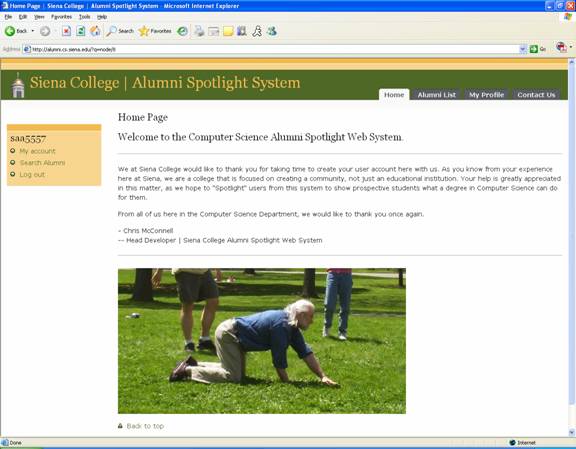
This is the screen that the user first sees when they log into the system. The user has many options from this page. They can view their own profile, search for other alumni, view a list of all the alumni, contact the administrator or log back out of the system.
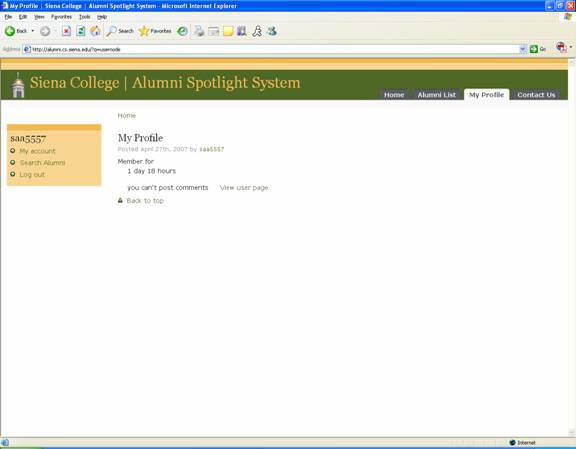
This screen appears when the user clicks the My Profile button. It tells the user how long they have been part of the system. It also allows the user to view their profile.

The users will see this screen once they successfully sign in to the system. After the user first registers, the profile will be blank. This screen consists of facts about the user including their careers, personal information, and their college life. This screen will also contain picture of the user that he/she chooses. From this screen the user will have multiple menu options which can be activated or deactivated by the Administrative user.


The purpose of this screen is to allow new users to join the community. This screen is where new users will register for an account. The user’s email address will serve as their user name, or account ID for the web system. The user is then given a temporary password, which will confirm their account, and an email will be sent with the user’s password. Upon successful submission, the user will be directed to a confirmation screen. If the submission is unsuccessful, the screen will be reloaded with a note stating the reason for the error. This screen will be accessed from the sign on screen and possibly from other locations undetermined at this time.
Registration Screen Continued (1)

Registration Screen Continued (2)
Registration Screen Continued
(3)

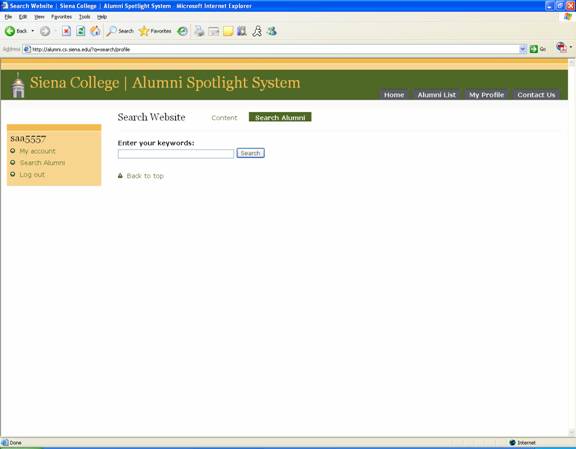
Using this screen, registered users will be able to
search for other members in the community. The user will search for other users
by entering any one field of the user’s profile. For example, if the user
enters “2007” then all of the users who graduated in 2007 will be returned.
This screen is accessed by clicking the Search
Alumni link on the user menu.
Search Yielding No Results Screen
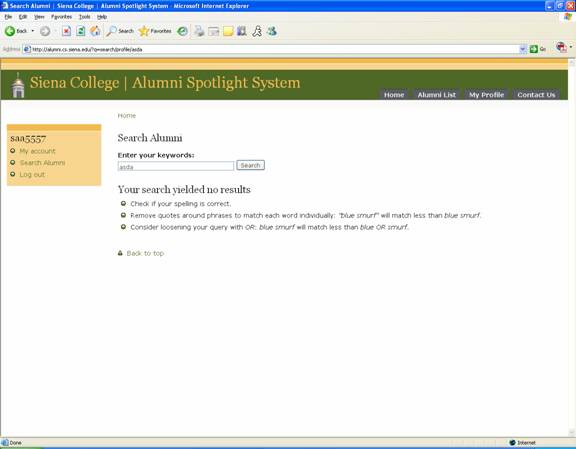
This is the screen that will be returned to a user who has done a search – both for users and content – and nothing has been found.
Search Yielding Results Screen

This is the screen that will be returned to a user who has done a search – both for users and content – and something has been found.
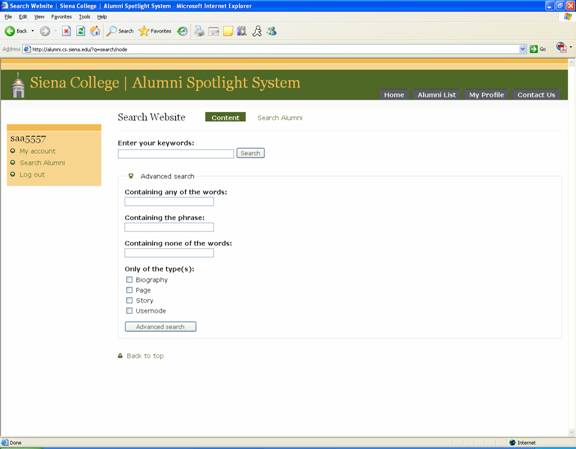
This screen can be found by clicking on the “search” button at the top of the site with out entering any information in the text box. From this screen the user can select to search through the users, or the site’s content to find their string. There is also addition advanced options that the user can select from.

This is the newly redesigned Siena College Computer
Science homepage. The red square is
where the Alumni Spotlight Profiles will be placed upon selection by the
administrator.
Welcome Screen
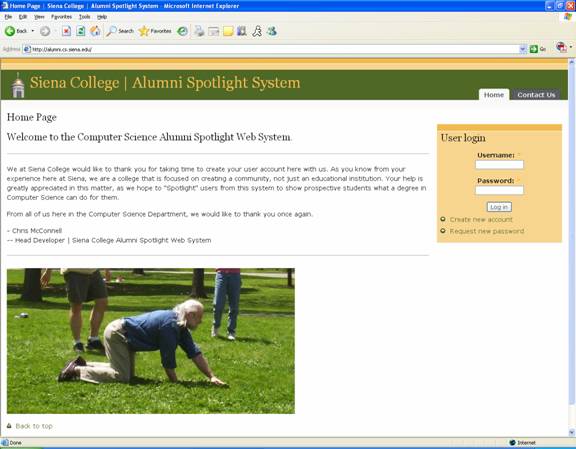
This is the screen that anyone will see upon visiting the site and not being logged in. From here the person can read what the site is about, then choose to create a new account or log in if they have already registered. The user can also e-mail the administrator if they forgot their password.
1. The first time a user goes to our site – http://alumni.cs.siena.edu – they will be required to create an account by clicking on “Create New Account”
2. Once in the account page, a user must enter the following items:
i. A user name which the user may choose to their liking.
ii. An E-mail address which will not be shown to the rest of the community.
iii. Their full name to be used for verification that they are a legitimate Siena Alumni later on.
3. With those required fields entered, the user can then choose to fill
out any other information about themselves that they wish, and
even upload a photo of themselves to go with their information.
4. Upon submission, the user will then be logged in, and taken to the home page where they will be able to search other classmates, or simply browse the users that are registered with the system.
1. Returning users can log in by typing their user name and password
into the appropriate boxes, and hit “Log In” to reach the system.
2. If the returning user has lost their password, they can contact the
systems administrator to request their password be reset to a new one, which they can then change upon successful login.
1. The administrative user will have to log in with the specified
administrator password and username.
2. Upon log in, the admin has multiple options as follows:
i. The admin can search the website for users to spotlight like other users of the system.
ii. The admin can create new static pages for the site, for example, a new home page or perhaps a description page talking about why this project is important to the college.
iii. The admin can view, change, or delete user profiles that are
considered a joke, or are inappropriate by referring to the control
panel.
iv. The admin control panel can be used to handle multiple types of changes on the site, such as layout schemes, access permissions, menu items, navigation items, and built in roles created by the Initrode team to limit access to certain users. A full list of the functionality of each administrative menu can be found online, and a link will be provided to our client – Dr. Eric Briemer – for reference on how each part works.
To be delivered with the final version of the Alumni Spotlight Web System are the following items:
A Compact Disc including:
· All directories and files for the team website (including all documents and files posted on the website).
· All directories and files necessary to run the Alumni Spotlight System.
· The final Acceptance test document and Test Results document.
The following is a complete directory listing of all files created during the development process of the Alumni Spotlight Web System. Please note that all source code that has been created or edited by the Initrode Solutions team has been posted on the web at the following address:
http://oraserv.cs.siena.edu/~perm_initrode/documents/project/AlumniSourceCode.doc
- Alumni.cs.siena.edu
- files
- pictures
- picturename.jpg/gif/bmp
– pictures uploaded for user profiles
- includes
- backup-common.inc
- backup-form.inc
- bootstrap.inc
- cache.inc
- common.inc
- database.inc
- database.mysql.inc
- database.mysqli.inc
- database.pgsql.inc
- file.inc
- form.inc
- image.inc
- install.inc
- install.mysql.inc
- install.mysqli.inc
- install.pgsql.inc
- locale.inc
- menu.inc
- module.inc
- pager.inc
- path.inc
- session.inc
- tablesort.inc
- theme.inc
- unicode.inc
- xmlrpc.inc
- xmlrpcs.inc
- misc
- farbtastic
- arrow-asc.png
- arrow-desc.png
- autocomplete.js
- blog.png
- collapse.js
- drupal.js
- drupalicon.png
- favicon.ico
- feed.png
- forum-closed.png
- forum-default.png
- forum-hot.png
- forum-new.png
- forum-sticky.png
- grippie.png
- jquery.js
- maintenance.css
- menu-collapsed.png
- menu-expanded.png
- menu-leaf.png
- powered-black-135x42.png
- powered-black-80x15.png
- powered-black-88x31.png
- powered-blue-135x42.png
- powered-blue-80x15.png
- powered-blue-88x31.png
- powered-gray-135x42.png
- powered-gray-80x15.png
- powered-gray-88x31.png
- print.css
- progess.gif
- progress.js
- tableselect.js
- textarea.js
- throbber.gif
- update.js
- upload.js
- watchdog-error.png
- watchdog-ok.png
- watchdog-warning.png
- xml.png
- modules
- aggregator
- aggregator.css
- aggregator.info
- aggregator.install
- aggregator.module
- block
- block.css
- block.info
- block.module
- blog
- blog.info
- blog.module
- blogapi
- blogapi.info
- blogapi.module
- book
- book.css
- book.info
- book.install
- book.module
- color
- images
- hook.png
- lock.png
- color.css
- color.info
- color.install
- color.js
- color.module
- comment
- comment.css
- comment.info
- comment.install
- comment.module
- contact
- contact.info
- contact.install
- contact.module
- drupal
- drupal.info
- drupal.install
- drupal.module
- filter
- filter.info
- filter.module
- forum
- forum.css
- forum.info
- forum.install
- forum.module
- help
- help.css
- help.info
- help.module
- legacy
- legacy.info
- legacy.module
- locale
- locale.css
- locale.info
- locale.install
- locale.module
- menu
- menu.info
- menu.module
- node
- content_types.inc
- node.css
- node.info
- node.module
- path
- path.info
- path.module
- ping
- ping.info
- ping.module
- poll
- poll.css
- poll.info
- poll.install
- poll.module
- profile
- profile.info
- profile.install
- profile.module
- search
- search.css
- search.info
- search.install
- search.module
- statistics
- statistics.info
- statistics.install
- statistics.module
- system
- admin.css
- defaults.css
- system.css
- system.info
- system.install
- system.module
- taxonomy
- taxonomy.info
- taxonomy.module
- throttle
- throttle.info
- throttle.module
- tracker
- tracker.css
- tracker.info
- tracker.module
- upload
- upload.info
- upload.module
- user
- user.css
- user.info
- user.module
- watchdog
- watchdog.css
- watchdog.info
- watchdog.module
- personalprofile.inc
- personalprofile.module
- profiles
- default
- default.profile
- scripts
- code-clean.sh
- code-style.pl
- cron-curl.sh
- cron-lynx.sh
- sites
- all
- modules
- bio
- bio.info
- bio.install
- bio.module
- LICENSE.txt
- README.txt
- cck
- po
- cck.pot
- es.po
- fr.po
- nl.po
- ru.po
- vi.po
- theme
- field.tpl.php
- field-field_my_field.tpl.php
- node-content_example.tpl.php
- template.php
- README.txt
- CHANGELOG.txt
- content.css
- content.info
- content.install
- content.module
- content_admin.inc
- content_copy.info
- content_copy.module
- content_crud.inc
- content_pathauto.inc
- content_views.inc
- field.php
- fieldgroup.info
- fieldgroup.install
- fieldgroup.module
- LICENSE.txt
- nodereference.info
- nodereference.install
- nodereference.module
- number.info
- number.install
- number.module
- optionwidgets.info
- optionwidgets.install
- optionwidgets.module
- README.txt
- text.info
- text.install
- text.module
- UPGRADE.txt
- userreference.info
- userreference.install
- userreference.module
- myspace
- personalprofile.inc
- personalprofile.module
- nodefamily
- nodefamily.info
- nodefamily.install
- nodefamily.module
- LICENSE.txt
- README.txt
- nodeprofile
- nodeprofile.info
- nodeprofile.module
- LICENSE.txt
- README.txt
- usernode
- usernode.info
- usernode.install
- usernode.module
- LICENSE.txt
- README.txt
- template.php
- README.txt
- default
- settings.php
- themes
- aberdeen-liquid
- favicon.ico
- logo.png
- logo2.png
- screenshot.png
- style.css
- images
- bg-admin-panel.gif
- bg-bar.png
- bg-bar-white.png
- bg-block.gif
- bg-body.gif
- bg-body-old.gif
- bg-content-tab.gif
- bg-header.gif
- bg-header-tab-bottom-active.gif
- bg-header-tab-left.gif
- bg-header-tab-left-active.gif
- bg-header-tab-left-hover.gif
- bg-header-tab-right.gif
- bg-header-tab-right-active.gif
- bg-header-tab-right-hover.gif
- bg-main.gif
- bg-primary-links.gif
- ico-settings.gif
- link-arrow-up.gif
- menu-collapsed.gif
- menu-expanded.gif
- menu-leaf.gif
- watchdog-error.gif
- watchdog-ok.gif
- watchdog-warning.gif
- BACKUPstyle.css
- block.tlp.php
- box.tlp.php
- comment.tlp.php
- favicon.ico
- LICENSE.txt
- logo.png
- node.tpl.php
- page.tpl.php
- print.css
- screenshot.png
- screenshot-drupal.png
- style.css
- template.php
- bluemarine
- block.tpl.php
- box.tpl.php
- comment.tpl.php
- logo.png
- node.tpl.php
- page.tpl.php
- screenshot.png
- style.css
- chameleon
- marvin
- bullet.png
- durpal-watermark.png
- logo.png
- screenshot.png
- style.css
- background.png
- chameleon.theme
- common.css
- logo.png
- screenshot.png
- style.css
- engines
- phptemplate
- block.tpl.php
- box.tpl.php
- comment.tpl.php
- default.tpl.php
- node.tpl.php
- phptemplate.engine
- garland
- color
- base.png
- color.inc
- preview.css
- preview.png
- images
- bg-bar.png
- bg-bar-white.png
- bg-content.png
- bg-content-left.png
- bg-content-right.png
- bg-navigation.png
- bg-navigation-item.png
- bg-navigation-item-hover.png
- bg-tab.png
- body.png
- gradient-inner.png
- menu-collapsed.gif
- menu-expanded.gif
- menu-leaf.gif
- minnelli
- color
- base.png
- color.inc
- preview.png
- logo.png
- screenshot.png
- style.css
- block.tpl.php
- comment.tpl.php
- fix-ie.css
- logo.png
- node.tpl.php
- page.tpl.php
- print.css
- screenshot.png
- style.css
- template.php
- pushbutton
- arrow-next.png
- arrow-next-hover.png
- arrow-next-visited.png
- arrow-prev.png
- arrow-prev-hover.png
- arrow-prev-visited.png
- arrow-up.png
- arrow-up-hover.png
- arrow-up-visited.png
- background.png
- block.tpl.php
- box.tpl.php
- comment.tpl.php
- forum-container.jpg
- forum-link.png
- header-a.jpg
- header-b.jpg
- header-c.png
- icon-block.png
- icon-comment.png
- logo.png
- logo-active.jpg
- logo-background.jpg
- logo-hover.jpg
- node.tpl.php
- page.tpl.php
- screenshot.png
- style.css
- tabs-off.png
- tabs-on.png
- tabs-option-hover.png
- tabs-option-off.png
- tabs-option-on.png
- spotlight
- People
- _img
- _inc
- files
- index.php
- spotlight.php
- CHANGELOG.txt
- cron.php
- index.php
- INSTALL.mysql.txt
- INSTALL.pgsql.txt
- install.php
- INSTALL.txt
- LICENSE.txt
- MAINTAINERS.txt
- p_0012.jpg
- robots.txt
- update.php
- UPGRADE.txt
- xmlrpc.php
Major sources of information for this project include the module readme files located at www.drupal.org. In addition, www.w3schools.com was often used as a general purpose reference in the areas of PHP, HTML, and SQL. In addition to these technical websites, www.google.com was also a commonly used tool to find short answers to relatively simple questions.
Other very important information (on a wide variety of topics) was obtained from people who are considered experts in their field. These experts include Mr. Ken Swarner, Mr. Eric Crossman, Dr. Eric Breimer and Dr. Tim Lederman.
Cascading Style Sheets (CSS) – These are used to describe a specific style for a web page or set of pages, a website.
Code - The symbolic arrangement of data or instructions in a computer program or the set of such instructions.
Content Management System (CMS) – Web based management system that will allow the team and webmaster to edit, modify, and remove profiles and web pages.
Data Flow Diagram – A representation of the functional decomposition of a system.
Database - A collection of data arranged for ease and speed of search and retrieval.
Domain Name Server
(DNS) - A general-purpose
distributed, replicated, data query service chiefly used on Internet for translating hostnames into Internet
addresses. Also, the style of hostname used on the Internet, though such a name is
properly called a fully qualified domain name. DNS can be configured to use a sequence of
name servers, based on the domains in the name being looked for, until a match
is found.
Drupal – An open-source content management system that is versatile and allows the user to personalize a network of profiles. There are several different themes and colors for visual effects. Drupal comes with the ability to handle self-registration pages, blogs, and easy file uploading. It allows the profiles to be organized into separate categories and to set permissions for the profiles. Lastly, Drupal has the ability to track changes made to the user profiles. The administrator will be able to view all of these changes
Extensible Hypertext Markup Language (XHTML) – has same capabilities of HTML but is more restricted to allow for conformity among multiple platforms.
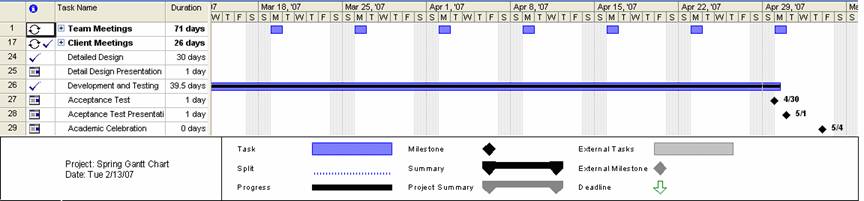
Gantt chart - A chart that depicts progress in relation to time, often used in planning and tracking a project.
GD Library - GD is an open source code library for the dynamic creation of images by programmers. GD is written in C, and "wrappers" are available for Perl, PHP and other languages. GD creates PNG, JPEG and GIF images, among other formats. GD is commonly used to generate charts, graphics, thumbnails, and most anything else, on the fly. While not restricted to use on the web, the most common applications of GD involve web site development.
Hypertext Markup Language (HTML) – Predominant markup language used for the creation of webpages.
Integration Test - the process in Software Engineering when individual modules are combined and tested as a group.
Internet - An interconnected system of networks that connects computers around the world via the TCP/IP protocol.
Internet Explorer (IE) – Microsoft based program used for browsing the internet.
Linear Sequential Model / Classic Waterfall Model – A systematic, sequential approach to software development that begins at the system level and progresses through analysis, design, coding, testing, and support.
Lynx - a text based browser for the World Wide Web.
Mailto - The name assigned to the html tag that is responsible for allowing someone to click on a word or words and then directly send an email message from the web.
Markup Languages – Combines a set of text, along with extra information about this text, such as formatting.
MySQL – A Multithreaded, multi-user SQL Database Management System.
PHP Hypertext Preprocessor (PHP) – An open source (free) programming language that is used for dynamic pages and is a high-level scripting language.
Portal – a specific kind of Content Management
System Web site, password protected to allow Site Administrators to edit text,
images and other content as and
when necessary. This allows easy updating of the website content without the
need to learn programming code.
Profiles – User created accounts that will be customizable according to each specific person.
Pseudocode - A notation resembling a programming language but not
intended for actual compilation. It usually combines some of the structure of a
programming language with an informal natural-language description of the
computations to be carried out.
Regression Testing - testing that is meant to uncover errors that may occur when one feature of an application is changed.
Transmission Control Protocol/Internet Protocol (TCP/IP)
- A communications protocol for computer
networks, the main protocol for the Internet.
Unit Test - a
procedure used to validate that individual modules or units of source code are
working properly.
Web log - an
online journal comprised of links and postings in reverse chronological order,
meaning the most recent posting appears at the top of the page. Also known as a blog.