Acceptance Test
Requested
by: Dr. Darren Lim
Assistant Professor
Department of Computer Science
Dr.
Manimoy Paul
Assistant Professor
Department
of Quantitative Business Analysis
International Online Survey
(IOS)
Bad Robot Enterprises
Prepared
by: Ryan Rose
Ryan May
Paul Borchers
Vito Urbano
April 29, 2008
International Online Survey
Detailed Design
Table of Contents
Section 1: Product Overview
and Summary------------------------------------------------------- 3
Section 2: Subprogram
Interface Specifications-------------------------------------------------- 3
Section 3: Use-Case Scenarios----------------------------------------------------------------------- 3
Testing
Requirements---------------------------------------------------------------------------------8
Section 5: Functional
Requirements Inventory---------------------------------------------------- 8
5.1: Non-Functional Requirements
Inventory-------------------------------------------- 16
Section 6: User Displays,
Report Formats, and User Command Summary--------------------19
Section 7: Acceptance Test
(See attached Test Plan Document)-------------------------------- 41
Section 8: Unit Tests (See
attached Test Plan Document)--------------------------------------- 41
Section 9:
Appendix--------------------------------------------------------------------------------- 42
9.1 Glossary of
Terms--------------------------------------------------------------------- 43
9.2 Timeline (Gantt chart)----------------------------------------------------------------- 44
Section
1: Product Overview and Summary
A great deal of information on
certain topics can be gained through the use of surveys. The International
Online Survey (IOS) system will provide users with the ability to create and
take surveys through a web-based program.
Teachers will be able to create surveys and give them to their students
and students will be able to take these surveys quickly and easily. Both types
of users will be able to view survey results to gain the data they need or
desire. Administrators will oversee this program and maintain functionality of
the IOS.
This document will be centered
around the final program and it subsequent testing.
Section 2: Subprogram
Interface Specifications
The modules included
with the International Online Survey are the Administrator, the Teacher, the
Student, and the Anonymous [user]. These
four modules or users work independently of one another, while some of the data
they create is shared through the database.
Each user does their specific tasks to create the desired outcome of
functionality from the International Online Survey.
Section 3: Use-Case Scenarios
Documentation Prologue for
Each Routine
Administrator User
Login
1. The user submits login information to the CMS.
2. The CMS verifies the login information.
3. If login information contains correct user name and password combination, the user is directed to his/her homepage.
1. The user modifies his/her account.
a. Username
b. Password
c. Secret Question and Answer
2. The changes are submitted to the CMS.
1. The user clicks on the forgotten password link and enters his/her answer to their secret question as well as his/her email address.
2. An e-mail is sent to the user’s registered e-mail account with a random username and password which can be changed after the user logs in.
Delete a Survey
1. The user navigates to the welcome page, and under the “Surveys” division clicks the button next to the survey to be deleted.
2. The survey will be deleted from the database and removed from the survey list on the welcome page.
Ban a Survey
1. The user navigates to the welcome page, and under the “Quality Control” division clicks the button next to the survey to be banned.
2. The survey will be inactivated, and the specific question causing the ban deleted from the database and survey. The user in charge of the survey will be notified of this change to their survey via email.
List Current Users
1. The user navigates to the welcome page, and clicks the List Current Users link at the top of the page.
2. The user will have the ability to either list the current users alphabetically or search for users.
3. Clicking the search button or a letter listed will display the users.
Teacher User
Login
1. The user submits login information to the CMS
2 The CMS verifies the login information
3. If login information contains correct user name and password combination, the
user is directed to his/her homepage.
Registration
1. The user clicks on the Register Now as a Teacher link
2. The user fills out the information required to register
3. The user may fill in the optional information or leave it unfilled
4. The user clicks the submit button
5. The user is automatically logged in and directed to his/her welcome page
Manage Account
1. The user modifies his/her account.
a.Username
b.Password
c. Secret Question and Answer
2. The changes are submitted to the CMS.
Forgotten Password
1. The user clicks on the forgotten password link and enters his/her answer to their secret question as well as his/her email address.
2. An e-mail is sent to the user’s registered e-mail account with a random username and password which can be changed after the user logs in.
Create a Survey
1. The user enters the desired survey name and topic and selects to make their survey Anonymous or Protected.
2. The user is directed toward a page which displays questions they have added as well as an Add a Question button.
3. Clicking the Add a Question button directs the user to a page that allows them to select the type of question to be added to their survey.
4. After choosing the type of question and filling out the required fields for the question, the user clicks submit and is directed back to a page that displays questions they have added as well as an Add a Question button and preview button.
5. The user then can save their progress by clicking the save button, activate
their survey by clicking the activate button, or preview the survey at its current state by clicking the preview button.
Activate a Survey
1. The user enters navigates to the Unpublished Surveys subdivision under the Active and Unpublished Surveys division.
2. Clicking the button next to the unpublished survey will prompt the user to enter the email addresses of the students that will be given permission to take it. There is also a choice for the teacher to create a new student if necessary.
3. Clicking the Add button will add more email fields and clicking the submit button will give the specified students permission to take the survey.
4. Filling the fields for username and password will create a new user in the database.
Delete a Survey
1. The user can delete any survey under the History or Active and Unpublished Survey divisions by clicking the delete button next to each survey.
2. The selected survey will be deleted from the database
Stop a Survey
1. The user navigates to the Active Surveys subdivision under the Active and Unpublished Surveys division.
2. After clicking the stop button corresponding to the survey to be stopped, the survey will be added to the Completed Surveys division
Student User
Login
1. The user submits login information to the CMS
2 The CMS verifies the login information
3. If login information contains correct user name and password combination, the
user is directed to his/her homepage.
Registration
1. The user clicks on the Register Now as a Student link
2. The user fills out the information required to register
3. The user may fill in the optional information or leave it unfilled
4. The user clicks the submit button
5. The user is automatically logged in and directed to his/her welcome page
Manage Account
1. The user modifies his/her account
a. Username
b. Password
c. Secret Question and Answer
d. Personal Information
2. The changes are submitted to the CMS
Forgotten Password
1. The user clicks on the forgotten password link and enters his/her answer to their secret question as well as his/her email address.
2. An e-mail is sent to the user’s registered e-mail account with a random username and password which can be changed after the user logs in.
Take a Survey
1. The user can take any survey that has not been started or finished by navigating to the Non-Completed Surveys division and clicking on the link that corresponds to the survey name.
The user is brought to the last save point of that survey.
Testing
Requirements
Section
4: Functional Requirements Inventory
The following list outlines the required functionality to be included in the final solution. The requirements are listed according to user case and then by screens the user will view.
General:
- The International Online Survey is web-based.
- It will be built in php and html with a mysql database.
Administrator:
- The Administrator user will have an account.
- The Administrator user will have a username and password.
- The Administrator user will have a secret question and answer to retrieve a forgotten password.
Login Screen:
- The Administrator will log in with correct username and password.
- An incorrect login will provide an appropriate error message.
- If the Administrator has forgotten his/her password the Administrator can click on the forgot password link.
Administrator Welcome Screen:
- The Administrator will be able to view all surveys in the Surveys section.
- Administrator will be able to scroll through a list of surveys.
- Administrator can use the search bar to search for users and surveys.
- The Administrator will have a link to list all of the current users.
- Administrator will be taken to the List Current Users Page where the Administrator can search for a specific user or list then alphabetically.
- This page can also be gotten to from entering a name in the Search bar at the top of the page.
- The Administrator will be able to see site statistic in the Current Stats section.
- Displayed will be total users, current users logged in, total surveys created, and total surveys published.
- The Administrator will be able to see all users that are currently logged in.
- This is located in the Current Users Logged In section.
- The Administrator will be able to view messages from users.
- This is located in the Quality Control section.
- It will show shot snippet of the message and the date it was sent on.
- The Administrator will be able to view surveys that have words that have been marked as offensive by the developers.
- The Administrator will see a list of surveys and a button next to the survey name to ban that survey.
- The Administrator can create new accounts through the Create Accounts button.
- Administrators can create new student and/or teacher accounts.
- Create Account button will take the administrator to the Account Creation Page.
- The Administrator will have a link to manage their account.
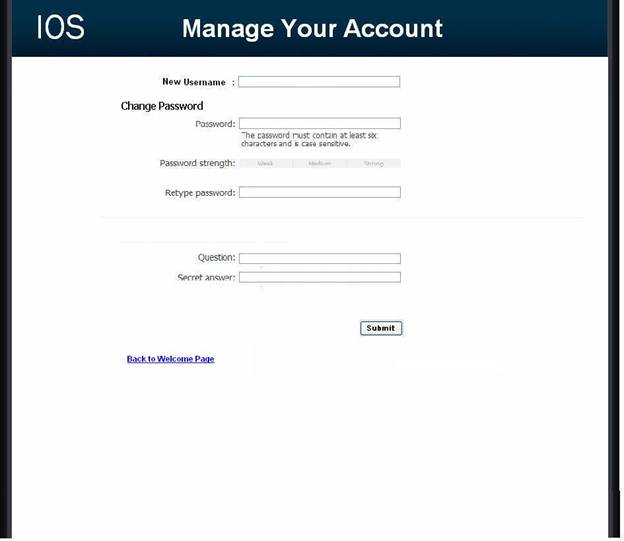
- Administrator can change their username, password, secret question, and secret answer.
- The Administrator will be able to logout from the welcome screen by clicking the "Logout" link.
Manage Account Screen:
- The Administrator will be able to change their account name, password, secret question, and secret answer.
- The Administrator will be able to submit new values for any fields or return to the administrator home page.
Change User Password Screen:
- The Administrator user will be able to choose a user for which the password is to be changed.
- The Administrator will enter a new password for the chosen user.
- The Administrator will submit changes.
- A message will appear indicating that a change has been accepted.
- The
Administrator user will be able to exit the change user password screen.
Create An Account Screen:
- The Administrator will be able to input a new username and hit submit.
- Upon submission a randomly created password will be returned.
- The Administrator must then send the username and password to the individual.
- The Administrator user will be able to exit the create an account screen.
List Current Users Screen:
- The Administrator will be able to sort users alphabetically by selecting a letter.
- The Administrator will be able to search the users by account type.
- The Administrator will be able to search the users by typing in an account name in the search bar.
- The Administrator will be sent to the list current users results page after the search.
- The Administrator user will be able to exit the list current users screen.
List Current Users Results Screen:
- The Administrator will view search results alphabetically.
- The Administrator will be able see account names and account types of the search results.
- The Administrator will be able to click on the accounts to view information about them.
- The Administrator user will be able to exit the list current users results screen.
User Page (Teacher)
- Administrator
can click on a users name in the Current Users Logged In section of the
Administrator Home Page or through the List Current Users page.
- Adminstrator
will see all Active Surveys, Published Surveys, and Unpublished Surveys.
- There will be three sections with Active, Published, and Unpublished with the surveys name, topic, and date associated with that survey.
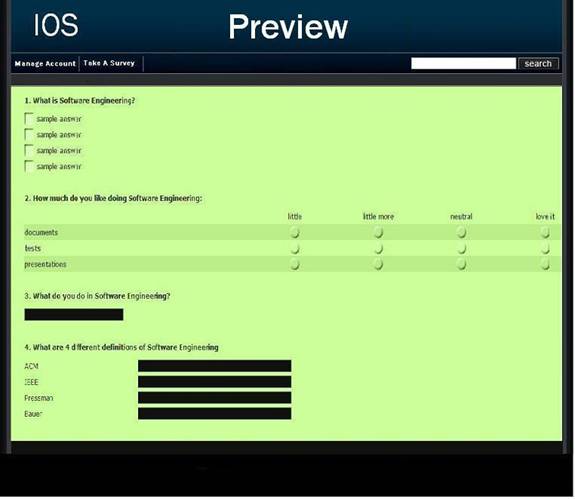
- Clicking on a survey name will display the Preview Survey page.
User Page (Student)
- Administrator
can click on a users name in the Current Users Logged In section of the
Administrator Home Page or through the List Current Users page.
- Adminstrator
will see all Active Surveys, Published Surveys, and Unpublished Surveys.
- There
will be three sections with Active, Published, and Unpublished with the
surveys name, topic, and date associated with that survey.
- Clicking
on a survey name will display the Preview Survey page.
Survey Preview Screen
- Administrator will be able to view the survey but will not be able to edit the survey.
Teacher:
- The Teacher user will have an account established by the Administrator or the Teacher can create their own account through the login page Button to Register Now As a Teacher.
- The Teacher user will have a username and password that the teacher has picked.
Login Screen:
- The user will log in with correct username and password.
- If the correct password has been lost the teacher can click on the Forgot Your Password to go to the Forgot Password page.
- An incorrect login will provide an appropriate error message.
- To create a new teacher account the user can click on the Register Now as a Teacher to go the Teacher Account Creation page.
Create Your Account:
- The Teacher will be able to input a username, password, select a secret question, and secret answer.
- The Teacher will be able to submit the inputted data.
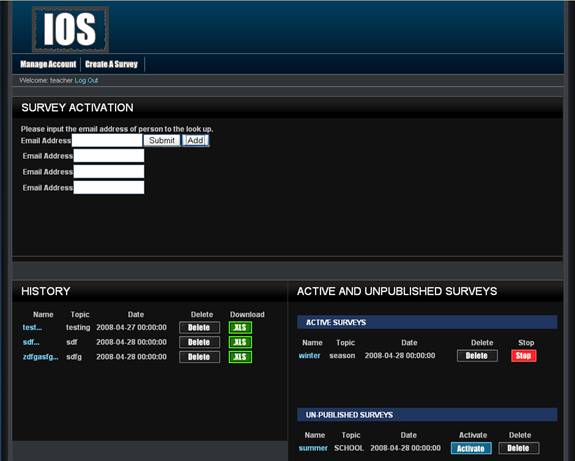
Teacher Welcome Screen:
- The Teacher will have a button to manage their account.
- Takes the Teacher to the Manage Your Account page for the Teacher accounts.
- The Teacher will have a button to create a survey.
- Takes the Teacher to the Initial Create a Survey page.
- The Teacher will be able to view all surveys the Teacher has created.
- These are separate into three groupings.
- Unpublished, Active, and Completed.
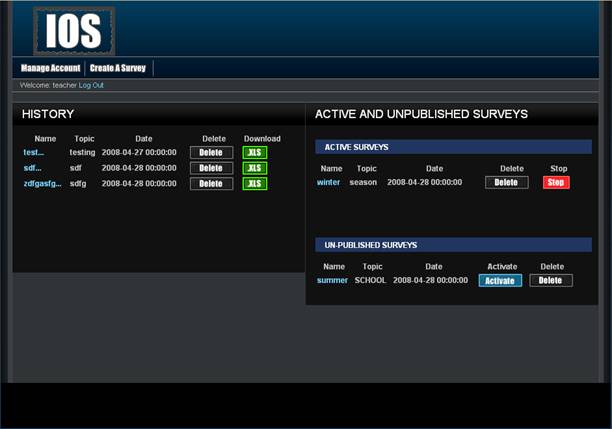
- The Teacher can view all of their Unpublished Surveys and choose to delete them on make them active with the Activate Button.
- Upon clicking on Activate the survey will be moved to the Active Surveys section.
- Upon deleting the survey will no longer be viewable.
- The Teacher can view all of their Active Surveys
- Clicking on the survey name will take them the teachers to a currents results page.
- Upon clicking the delete button the survey and all questions answer up to this time will be deleted from the database.
- Upon clicking the stop button the survey will be moved to the Completed Surveys section of this page.
- The Teacher van view all of their Completed Surveys
- Clicking on the delete button in the Completed Surveys section will delete that surveys questions and answer from the database.
- Clicking on the download button will allow the Teacher to download an excel file format.
- The Teacher will be able to select a specific survey and view those results.
- The Teacher will have access to a search bar, which searches the entire site.
- The
Teacher will be able to logout from the welcome screen by clicking the
"Logout" link.
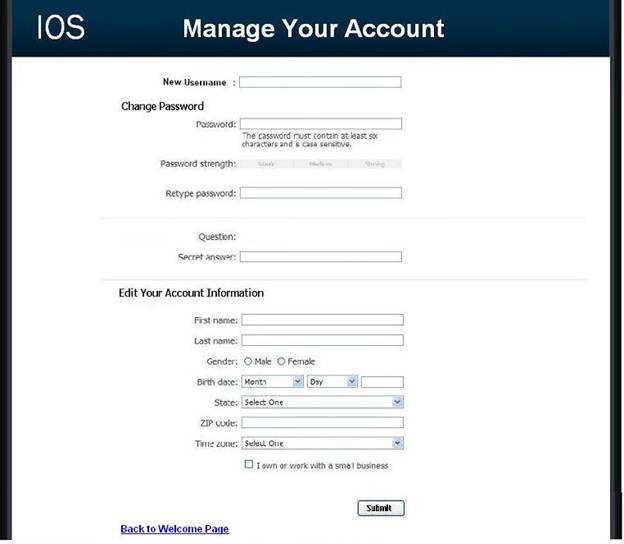
Manage Account Screen:
- The Teacher will be able to change their account name, password, secret question, and secret answer.
- The
Teacher will be able to submit new values for any fields or return to the
Teacher home page.
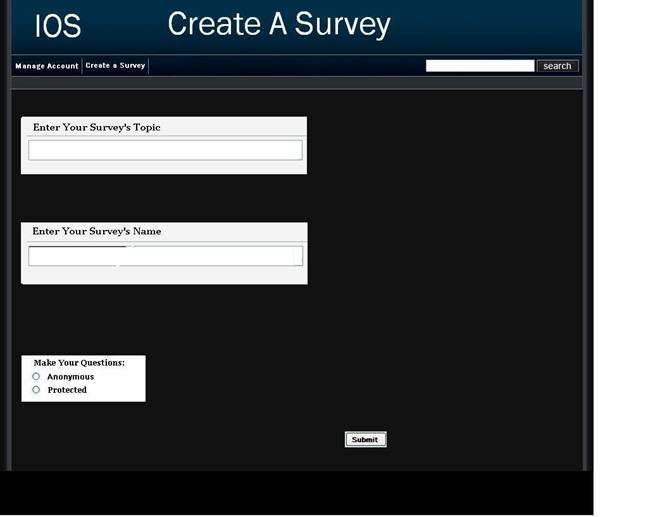
Initial Survey Creation Screen:
- The Teacher will be able add a name to the survey.
- The Teacher will be able to add a topic to the survey.
- The Teacher will be able to make the Survey Anonymous or Protected.
Survey Creation - Add a Question Screen:
- The Teacher will be able to choose from a number of question formats (multiple choice, T/F, short answer, etc.).
- The Teacher will be able to save the survey.
- The Teacher will receive a confirmation when the survey is saved.
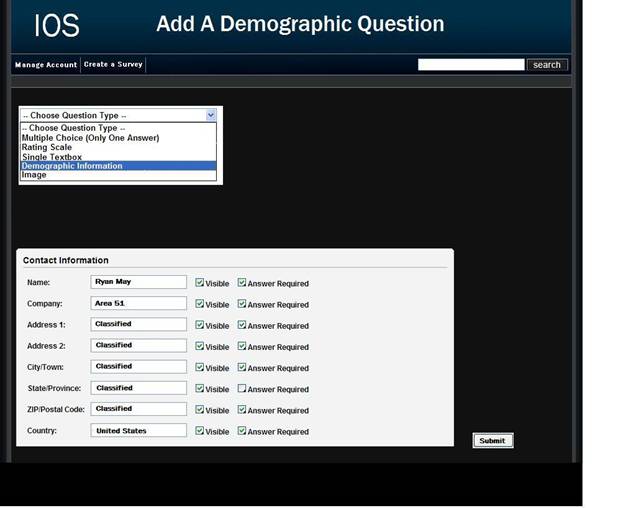
Survey Creation – Demographic Question Screen:
- The Teacher will be able to choose whether the following fields will be visible and/or required.
- Name, Company, Address 1, Address 2, City/Town, State/Province, ZIP, Postal Code, and Country.
- The Teacher will be able to click on a checkbox next the field they want to disable or enable.
- The Teacher will be able to submit the question by clicking on the Submit button.
Survey Creation – Ratings Scale Screen:
- The Teacher will be able to enter the questions text.
- The Teacher will be able to enter in how many rows they would want and what the text will be for each.
- There will be a input text box where the Teacher can put each rows text on a different line.
- The Teacher will be able to select how many Columns the Teacher would want.
- The limit of Columns or scale is 10.
- The Teacher can input these in the input text boxes.
- The Teacher will be able to submit the question by clicking on the Submit button.
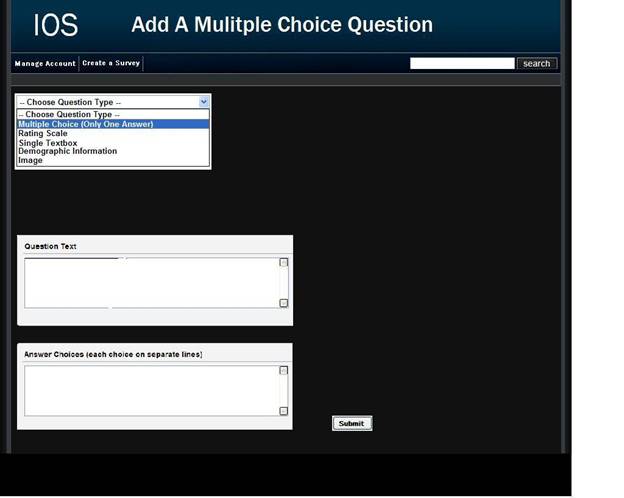
Survey Creation – Multiple Choice Screen:
- The Teacher will be able to input the text for the question.
- The Teacher will be able to input the choices for answers.
- The Teacher will have to put these answer on different lines in the text input box provided.
- The Teacher will be able to submit the question by clicking on the Submit button.
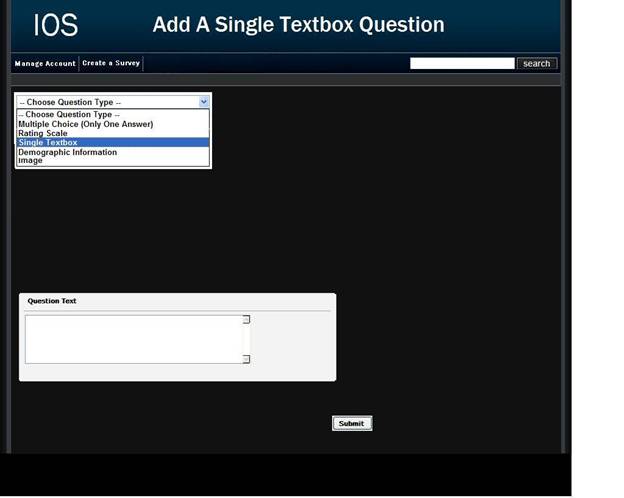
Survey Creation – Single Textbox Screen:
- The Teacher will be able to input the text for the question.
- The Teacher will be able to submit the question by clicking on the Submit button.
Survey Creation – Image Screen:
- The Teacher will be able to input the text for the question or a description of the image.
- The Teacher will be able to input the file location on their local computer or browser for the image on their local computer by clicking on the browse button.
- The Teacher will be able to submit the question by clicking on the Submit button.
Survey Creation – Edit Survey Screen:
- The Teacher will be able all questions for a survey.
- The Teacher will be able to add new questions by clicking on the Add Question button.
- The Teacher will be able to exit the Create a Survey page.
Student:
- The Student user will have an account established by the Administrator, Teacher, or through the front page Create an Account button for Students.
- If created by a teacher or administrator, their username and password will be given to them by their teacher or administrator outside of the IOS web pages.
- The Student user will have a username and password.
Login Screen:
- The user will login with correct username and password.
- An incorrect login will provide an appropriate error message.
Create Account Screen:
- The Student will be able to input their desired username and password.
- The Student will have to retype their password.
- The Student will be able to select the secret question the Student wants and what the answer to the question will be.
- The Student has the option of entering in their first name and last name.
- The Student has the option of entering in their gender.
- The Student has the option of entering in their birthday date.
- The Student has the option of entering in their state and zip code.
- The Student has the option of entering in their time zone.
- The Student can submit the information by clicking on the Submit button.
Welcome Screen:
- The Student will have a link to manage their account.
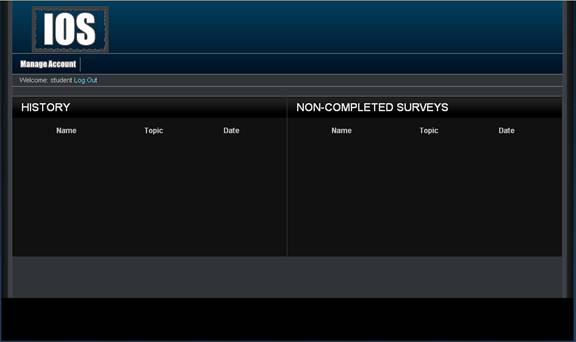
- The Student will have a list of surveys that the Student can take.
- This is in the Non-Completed Survey section.
- The Student will be able to click on a survey and will be directed to the complete survey screen.
- The Student will be able to view completed and incomplete surveys.
- The Student will have access to a search bar, which searches the entire site.
- The Student will be able to logout from the welcome screen by clicking the "Logout" link.
Create Account Screen:
- The Student will be able to change their username and password.
- The Student will have to retype their password.
- The Student will be able to select the secret question the Student wants and what the answer to the question will be.
- The Student has the option of entering in their first name and last name.
- The Student has the option of entering in their gender.
- The Student has the option of entering in their birthday date.
- The Student has the option of entering in their state and zip code.
- The Student has the option of entering in their time zone.
- The Student can submit the information by clicking on the Submit button.
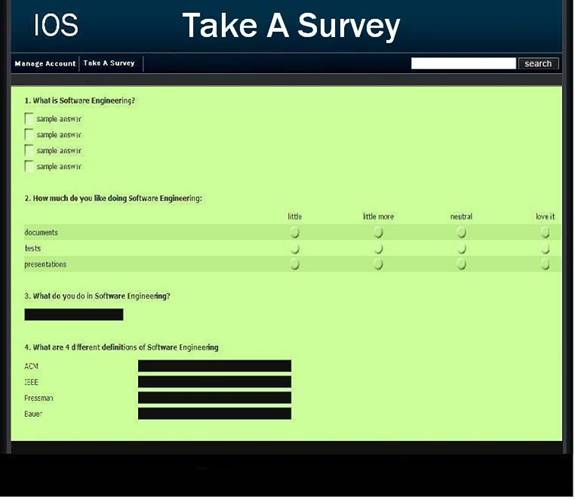
Take a Survey Screen:
- The Student will be able to answer all questions for a survey.
- The Student will be able to save their progress and come back at other time and finish.
- The Student will be able to submit their answers.
- The Student will be notified if any questions were left blank.
- The Student will be notified that their survey was submitted successfully.
- The Student will be able to exit the take a survey screen.
Search Results
Screen:
- The user will view search results alphabetically.
- The user will be able see account names and account types or survey names.
- The user will be able to click on the accounts or surveys to view information about them.
Teacher/Student:
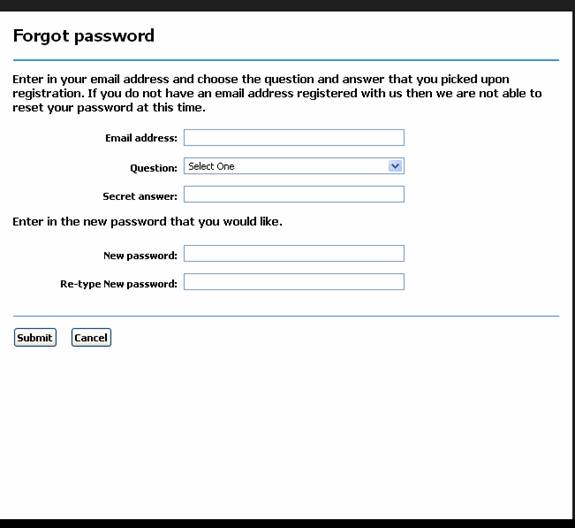
Password Recovery
Screen:
- The user must answer their secret question and submit their email address.
- The user will be sent an email containing their account password.
- The user will be shown a message if the secret question was answered wrong or if the email address entered was not found.
5.1 Non-Functional Requirements Inventory
- The system should be quick and smooth, using fast servers and databases.
The system should also be
aesthetically pleasing.
Section
5: Working/Testing Environment: System Specifications
The International Online Survey has been developed in the
Siena College Software Engineering Computer Laboratory. The Bad Robot Enterprises team has developed
the program on a server, which is a virtual machine that runs along side other
computers.
The following is a list of the machines that we conducted our development work on. It lists the machine’s specifications as well as the software on the machines that was used in developing our product.
Systems:
Dell Dimension Dim4550
Intel Pentium 4 2.40 GHz
1GB of RAM
Macintosh
iMac
2.0GHz
Intel Core 2 Duo
1GB of RAM
Server:
Oracle version 10.1
MySQL version 4.1.14
PHP version
4.3.11
Apache version
2.0.46
Browser Environnement:
Microsoft
Internet Explorer version 7.0.5730.13
Mozilla Firefox
version 2.0.0.14
Apple Safari 3.0
Software:
Adobe Acrobat Standard
version 7.0
Adobe Reader version 7.0
Microsoft Office Word 2003 11.6359.6360 SP1
Microsoft Office PowerPoint 2003 11.6361.6360 SP1
WinSCP version 4.0.4 (Build 346)
Putty release 0.60
Macromedia Dreamweaver MX 2004 Education Edition version 7.0
Macromedia Fireworks MX 2004 Education Edition version 7.0 (Build 288)
Visible Analyst Education Edition version 7.5.5
Microsoft Project 2000 9.0.2001.0219 SR-1
Microsoft Windows XP Professional Version 2002 Service Pack 2
External
Design Specifications
Section
6: User displays, report formats, and user command summary
6.1:
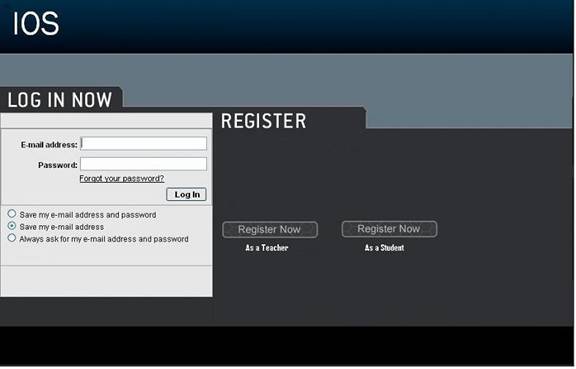
Login Page
This is the page
that all users will see when first locating the website. This page is where all users will enter their
username and password. If a user has not
already created an account, they can click on the appropriate "Register
Now" link that will take them to the account creation page.
6.2:
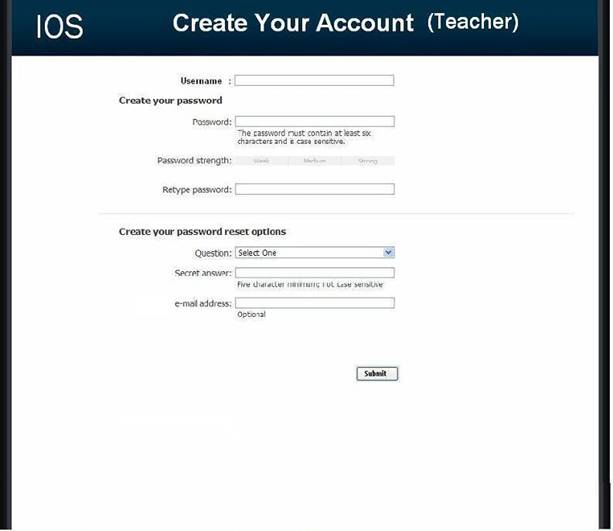
Teacher Account Creation Page
This page is reached
when the user has selected from the login page to register as a teacher. They
are required to provide a user name and password.
6.3:
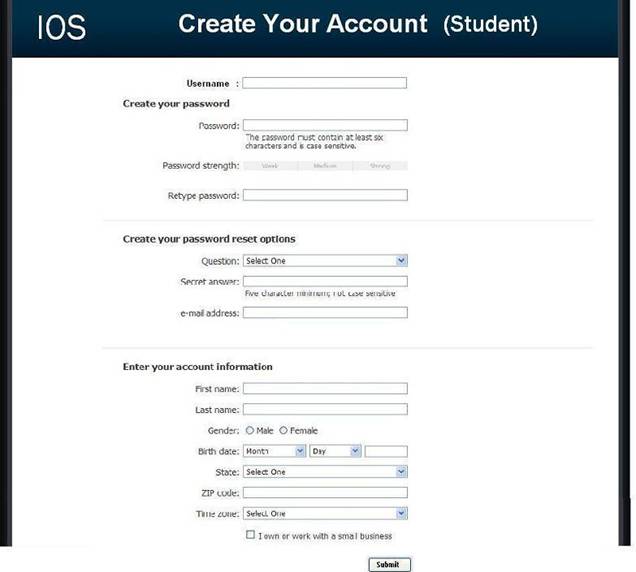
Student Account Creation Page
This page is reached when the user has selected from the
login page to register as a student. They are required to provide a user name
and password as well as some of their personal information.
6.4:
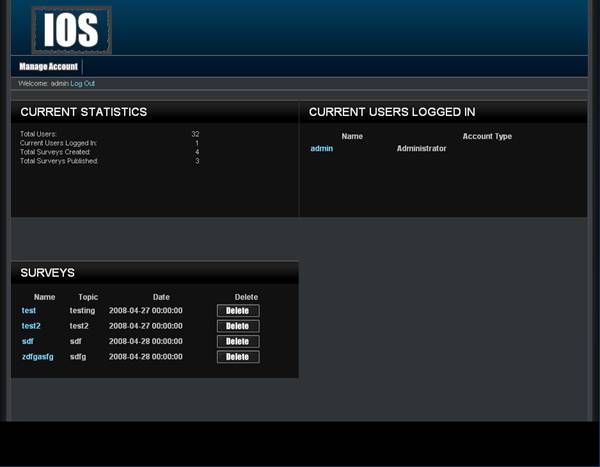
Administrator Welcome Page
The user is directed to this page when they have signed in
as an administrator. They will see features available to only administrators in
the top menu bar. They will also have access to information such as website
survey statistics, user login information, and surveys.
6.5:
Teacher Welcome Page
The user is directed to this page when they have signed in
as a teacher. They will see features available to only teachers in the top menu
bar as well as their history of surveys, and active and unpublished surveys.
6.6:
Student Welcome Page
The user is directed to this page when they have signed in
as a student. They will see features available to only students in the top menu
bar as well as their history of completed surveys and non – completed surveys.
6.7.1:
Administrator Account Management
Page
This page allows an administrator to modify their account
password.
6.7.2:
Teacher Account Management Page
This page allows a teacher to modify their account password.
6.8:
User Page (Teacher)
This page is reached by clicking a teacher's name in the Administrator welcome page. The page displays a unique teacher's account information and statistics.

6.9:
User Page (Student)
This page is reached by clicking a student's name in the
Administrator welcome page. The page displays a unique student's personal
information as well as their survey taking statistics.

6.10:
Teacher Initial Survey Creation
Page
This page is reached from the create a survey link which can
be seen by teacher accounts. The page is the first page a teacher will see
before going on to adding questions to their survey. The page requires the
teacher to enter a survey name and topic as well as making their survey
anonymous or protected.
6.11.0:
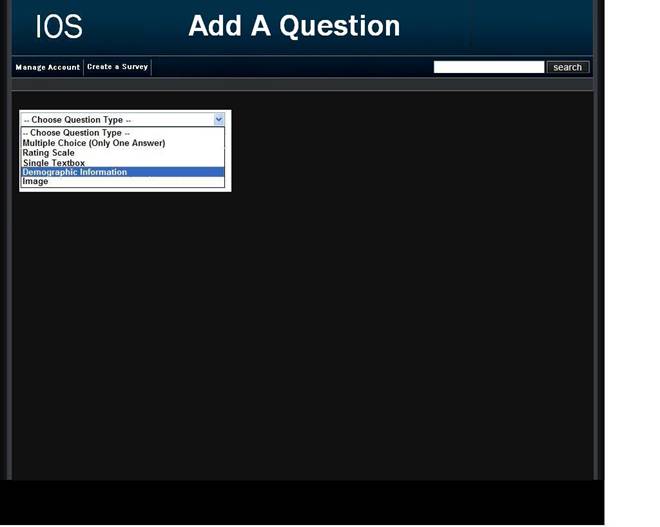
Teacher Add a Question Page
(Blank)
This page is reached either through the blank edit survey page or after adding a question. This page only consists of a drop down of question types.
6.11.1: Demographic
These pages allows for a teacher to create a survey. They are provided with different questions to chose from including demographic, multiple choice, textbox, rating scale, and image related questions.
6.11.2: Scale
These pages allows for a teacher to create a survey. They are provided with different questions to chose from including demographic, multiple choice, textbox, rating scale, and image related questions.

6.11.3: Multiple Choice
These pages allows for a teacher to create a survey. They are provided with different questions to chose from including demographic, multiple choice, textbox, rating scale, and image related questions.
6.11.4: Text Box
These pages allows for a teacher to create a survey. They are provided with different questions to chose from including demographic, multiple choice, textbox, rating scale, and image related questions.
6.12:
Teacher Survey Activation Setup
Page
This page allows a teacher to activate a survey. The teacher
is required to input the email addresses of the students he/she wants to have
rights to take the survey. There is an option to create student accounts if
necessary as well.
6.13: Student Account
Management Page
This page allows a student to edit their account information such as their username, password, and personal information.
6.14.0: Student Survey
Page
This page allows the student to answer questions of a survey that they have been given permission to take.
6.14.1: Teacher Preview of
Survey Page
This page allows a teacher to look at what their survey would look like at their current progress.
6.15:
Lost Password Recovery Page
This page is reached by clicking the "forgot your
password?" link on the login page. The user is required to fill in
information to have their password emailed to them.
6.16: Format of results downloads
This is the format
of the file that is downloaded when a teacher clicks on the download txt file
button next to the survey name on the Teacher Welcome Page.
Architectural
Design Specification
Section
7: Acceptance Test
See attached Test
Plan Document.
Section
8: Unit Tests
See attached Test
Plan Document.
Section
9: Appendix
9.1
Glossary of Terms
CSS – Cascading Style Sheets – These are used to describe a specific style for a web page or set of pages, a website.
Database - A collection of data arranged for ease and speed of search and retrieval.
Data Flow Diagram – A representation of the functional decomposition of a system.
Gantt Chart - A chart that depicts progress of jobs in relation to time. It is often used in planning and tracking a project.
Hypertext Markup Language (HTML) – Predominant markup language used for the creation of web pages.
Internet - A vast computer network linking smaller computer networks worldwide. The Internet includes commercial, educational, governmental, and other networks, all of which use the same set of communications protocols.
Internet Explorer(IE) – Microsoft based program used for browsing the Internet.
Linear Sequential Model / Classic Waterfall Model – A systematic, sequential approach to software development that begins at the system level and progresses through analysis, design, coding, testing, and support.
MySQL – A Multithreaded, multi-user Relational Database Management System.
OS X - The latest operating system for Macintosh computers, based on the Linux kernel but with a more user-friendly graphic interface. It includes networking capabilities.
PHP – PHP Hypertext Preprocessor – An open source (free) programming language that is used for dynamic pages and is a high-level scripting language.
Profiles – User created accounts that will be customizable according to each specific person.
XHTML – Extensible HyperText Markup Language – has same
capabilities of HTML but is more restricted to allow for conformity among
multiple platforms.
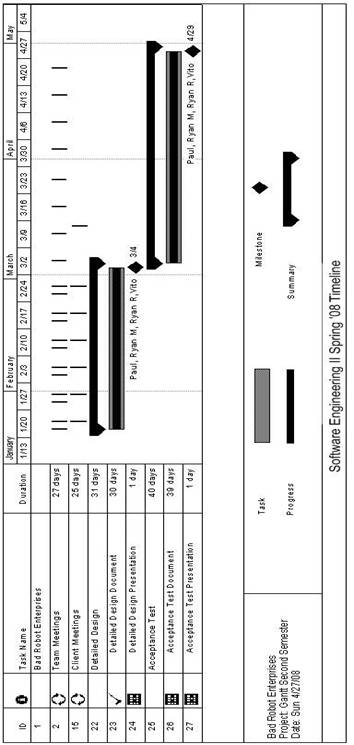
9.2 Timeline (Gantt chart)
9.3 Packaging Specifications
Bad Robot
Enterprises will install all the necessary files and features of the
International Online Survey on the Siena Computer Science network,
Oraserve. There will then be a web
address supplied for users to access our application.
All files and
applications will be put on a CD for future use.